
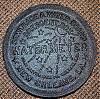
I'm trying to replicate this cut and am hoping for some help.
The cuts are approximately 3/8 inch wide, 2 1/4 inch deep, and set at a 50-degree angle. They are also 7/8 inch apart.
The wood is 1 x 3.
I tried using my dado on its narrowest setting (inside & outside blades only) but can't seem to get the angle/depth right.
Any helpful suggestions?
Thanks!
Morgan
Replicate cut
Moderators: HopefulSSer, admin
Replicate cut
- Attachments
-
- IMG_20121003_101534.jpg (75.55 KiB) Viewed 3290 times
Morgan
Blue Springs, MO
SS Mark 7 PP
Blue Springs, MO
SS Mark 7 PP
Since you want a 50 degree angle and the Shopsmith table tilts to 45 degrees, I don't think it can be done on the Shopsmith, although it might be possible if you added shims of the appropriate thickness under the table to add the extra five degrees of tilt needed. How safe that would be is something you'll have to determine. It would be doable on a Radial Arm Saw if you tilt the blade to 45 degrees and also add an auxiliary table that is sloped another 5 degrees.
Art in Western Pennsylvania
Router bit
How about using router on SS and if you don't have using router bit in chuck with wood on its side (wood under it also) and miter or fence at appropriate angle. Just trying to think outside the box.

Wow that is asking a lot of any table saw. As was mentioned the table tilts to only 45degrees, The maximum depth of cut with a 10" blade at 45 degrees is 2-3/8", an 8" dado would be an inch less then that, 1-3/8" and a 6" would get you 3/8".
I guess that pretty much tells the story.
If you could go to 45 degrees then you could use a 10" flat cut blade (rip) and make multiple passes to eat away the material.... You would need a backer board to support the cut, think attachment to the miter gauge.
Another option would be to drill a 3/8" hole at the depth location then use the bandsaw as was mentioned to cut along the lines to the hole. If you can't have a round bottom then you could clean it up with a chisel.
If we knew more what it was for we might have a few more ideas. Like if this were to hold fishing rods you might be able to use dowels/pegs and drill them in at 50 degrees.
So best of luck with this project, and let us know how you solved it.
Ed
If you don't have a router, this would be an opportunity to get one along with a pattern bit. If practical, you could use the original as a pattern. If not, you could make a pattern out of hardboard and use it in conjunction with an indexing pin (7/8") away from the center line of the pattern slot. Then move the pattern/piece dropping the indexing pin in the previously cut slot. Something like a box joint jig.
Rob in San Diego
Email: SDSSmith51 AT gmail.com
Email: SDSSmith51 AT gmail.com

How about using a band saw with a jig set to 50 degrees and make multiple cuts to remove the excess material in each slot?
________________________________________________________________________________________________
1981 Mark V 500, bandsaw, belt sander, jig saw, jointer; contractor's table saw; multiple circular saws and miter saws; and a trailer full of tools.
"It is better to remain silent and thought a fool than to speak out and remove all doubt"
Abraham Lincoln
1981 Mark V 500, bandsaw, belt sander, jig saw, jointer; contractor's table saw; multiple circular saws and miter saws; and a trailer full of tools.
"It is better to remain silent and thought a fool than to speak out and remove all doubt"
Abraham Lincoln
-
a1gutterman

- Platinum Member
- Posts: 3653
- Joined: Tue Jan 09, 2007 12:45 am
- Location: "close to" Seattle
Am I missing something? Why can't you lay the board flat, like your picture shows, on the saw table that is also in the normal position (perpendicular to the blade), raise the dado blade as high as it will go (to create as flat a bottom as possible) and use your miter guage (which CAN be set to 50 degrees) or a sliding table. You can then clean up the bottom of the cut with a chisel. Or am I missing something?
Tim
Buying US made products will help keep YOUR job or retirement funds safer.
Buying US made products will help keep YOUR job or retirement funds safer.
-
dusty

- Platinum Member
- Posts: 21371
- Joined: Wed Nov 22, 2006 6:52 am
- Location: Tucson (Wildcat Country), Arizona
No, you are right on. This will work BUT doing it this way introduces some hazard that must be considered. To minimize the amount of chisel work (to square the slot), the table will need to be lowered. This makes the slot more vertical but at the same time exposes a lot of the blade.a1gutterman wrote:Am I missing something? Why can't you lay the board flat, like your picture shows, on the saw table that is also in the normal position (perpendicular to the blade), raise the dado blade as high as it will go (to create as flat a bottom as possible) and use your miter guage (which CAN be set to 50 degrees) or a sliding table. You can then clean up the bottom of the cut with a chisel. Or am I missing something?
It will also be necessary to utilize an extension on the miter gauge. It was not stated how long these pieces are but the longer they are the longer the fence should be to maintain stability.
Note the angle of the blade as it passes through the 3/4" stock. Raising the table reduces blade exposure but also increases the angle of the blade.
[ATTACH]18692[/ATTACH]
Lower Table, Deeper Cut, Less Angle
[ATTACH]18693[/ATTACH]
Higher Table, Shallower Cut, More Angle
I need a miter gauge in Sketchup.
- Attachments
-
- Shopsmith Main Table Top with Blade at 50 degrees (Custom) (2).png (50 KiB) Viewed 3239 times
-
- Shopsmith Main Table Top with Blade at 50 degrees Safer (Custom).png (52.12 KiB) Viewed 3236 times
"Making Sawdust Safely"
Dusty
Sent from my Dell XPS using Firefox.
Dusty
Sent from my Dell XPS using Firefox.
-
dusty
- Platinum Member
- Posts: 21371
- Joined: Wed Nov 22, 2006 6:52 am
- Location: Tucson (Wildcat Country), Arizona
This will work BUT doing it this way introduces some hazard that must be considered. To minimize the amount of chisel work (to square the slot), the table will need to be lowered. This makes the slot more vertical but at the same time exposes a lot of the blade.a1gutterman wrote:Am I missing something? Why can't you lay the board flat, like your picture shows, on the saw table that is also in the normal position (perpendicular to the blade), raise the dado blade as high as it will go (to create as flat a bottom as possible) and use your miter guage (which CAN be set to 50 degrees) or a sliding table. You can then clean up the bottom of the cut with a chisel. Or am I missing something?
It will also be necessary to utilize an extension on the miter gauge. It was not stated how long these pieces are but the longer they are the longer the fence should be to maintain stability.
Note the angle of the blade as it passes through the 3/4" stock.
[ATTACH]18690[/ATTACH]
"Making Sawdust Safely"
Dusty
Sent from my Dell XPS using Firefox.
Dusty
Sent from my Dell XPS using Firefox.