It's been a while since I've had a project to do. Also some extra stress at work lately, so it was time for some "happiness dividends" from the Shopsmith. I have obtained another (my 4th) old machinist chest to restore. I have completely busted it down and have been fixing various components before getting it back together.
It's to the point that the front-panel has to be rebuilt before I can put any more pieces back together. While this is a quality box, I didn't like the look or feel of the plywood center-panel.
I've chosen, resawn, glued, and dressed a piece of Kentucky CoffeeTree wood for the center panel. After bandsawing to rough size, I'm tuning in the dimensions and squared edges with a shooting-plane gadget I made one day last year:
[ATTACH]21935[/ATTACH]
Now it's over to the OverArm Router station to do some rabbeting on the back face, and coving the edges on the front face of the panel:
[ATTACH]21936[/ATTACH]
As it happened, I messed up one edge a little bit. I was able to obscure the fault with a chisel, and also choose an orientation which will hide the fault in a natural "shadow" area of the assembly. Finally I've trimmed the last edge to allow just a big more room for cross-grain expansion/contraction inside the frame:
[ATTACH]21937[/ATTACH]
Now the glue-up is clamped for the frame, the front-panel of the machinist chest. Once this is done, I can slowly start many other pieces of re-assembly. On this chest, the front-panel will have pivot-pins that keep it trapped in grooves in the main carcass:
[ATTACH]21938[/ATTACH]
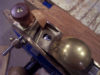
On to another overdue job; I needed a little wood wheel. I've had a fly-cutting hole "drill" for years, but in the 700rpm days it was kind of scary. Now the PowerPro lets me do 250rpm, which was a nicely controlled operation:
[ATTACH]21939[/ATTACH]
Sure felt good to have my hands busy again!
Back in the Machine(ist Chest) Shop
Moderators: HopefulSSer, admin
Back in the Machine(ist Chest) Shop
- Attachments
-
- Squaring Panel.jpg (113.57 KiB) Viewed 23183 times
-
- Rabbeting Panel.jpg (109.91 KiB) Viewed 23191 times
-
- Tweaking Edges.jpg (113.89 KiB) Viewed 23200 times
-
- Frame Glue_Up.jpg (111.44 KiB) Viewed 23192 times
-
- Slow Hole Drilling.jpg (104.58 KiB) Viewed 23187 times
Chris
-
Ed in Tampa

- Platinum Member
- Posts: 5829
- Joined: Fri Jul 21, 2006 12:45 am
- Location: North Tampa Bay area Florida
I did a few more "loud jobs" today while the wife was busy outside. My usual accommodation is to do quiet hand-work while this sensitive soul is in the house.
As I can do for all but the thickest/hardest woods, I just resaw my white oak right against the stock bandsaw fence, works great!
[ATTACH]21946[/ATTACH]
Now I'm using my tiniest router-bit, 1/16" diameter, to do some slitting:
[ATTACH]21947[/ATTACH]
The result is some stock I can use to make up a missing front-panel on one of the drawers of the machinist chest:
[ATTACH]21949[/ATTACH]
Off-line, I had removed rotted veneer from the top lid of the chest, and glued on some quartersawn oak veneer:
[ATTACH]21945[/ATTACH]
As I get back to some fine detail work, I like to handsaw my crosscuts manually. I've fixed up an old miter box and sharpened that saw -- it cuts very nicely. A missing piece was a sacrificial wheel to keep the saw from going too deep or otherwise out of control. Here's the wheel I made in the last posting:
[ATTACH]21948[/ATTACH]
A slow project, but coming along!
- Attachments
-
- Case Top Re_Veneered.jpg (99.89 KiB) Viewed 23055 times
-
- White Oak Resaw.jpg (98.92 KiB) Viewed 23133 times
-
- Slitting with OPR.jpg (99.08 KiB) Viewed 23101 times
-
- Sacrificial Wood Wheel.jpg (81.4 KiB) Viewed 23052 times
-
- Drawer_Front Stock.jpg (58.32 KiB) Viewed 23093 times
Chris
Turning the Corner
A few more steps done this morning....
I had cached up a bunch of vintage junk to de-rust all at the same time. Included in this were the pivot-pins at the bottom of the front-trim panel on the chest...
[ATTACH]22026[/ATTACH]
The oak piece that I profiled last week, I hand-cut and mated to the bottom drawer. I'll be doing a bit more strengthening on that drawer yet. In all the chests I've worked on, the biggest/lowest drawer always has the most wear on its components and runners:
[ATTACH]22027[/ATTACH]
With the de-rusted pivot pins, I was ready to commit the front-panel into the assembly, and glue the lower-corner box-joints (as well as plywood back panel, still without veneer for now) into a mighty carcass!
[ATTACH]22028[/ATTACH]
Now out to enjoy some fairly cool June weather this morning. The 50-year-old chest can wait a little longer to complete .
.
I had cached up a bunch of vintage junk to de-rust all at the same time. Included in this were the pivot-pins at the bottom of the front-trim panel on the chest...
[ATTACH]22026[/ATTACH]
The oak piece that I profiled last week, I hand-cut and mated to the bottom drawer. I'll be doing a bit more strengthening on that drawer yet. In all the chests I've worked on, the biggest/lowest drawer always has the most wear on its components and runners:
[ATTACH]22027[/ATTACH]
With the de-rusted pivot pins, I was ready to commit the front-panel into the assembly, and glue the lower-corner box-joints (as well as plywood back panel, still without veneer for now) into a mighty carcass!
[ATTACH]22028[/ATTACH]
Now out to enjoy some fairly cool June weather this morning. The 50-year-old chest can wait a little longer to complete
- Attachments
-
- Derusting Bath.jpg (108.43 KiB) Viewed 22965 times
-
- Back to 11 Drawers.jpg (109.08 KiB) Viewed 22962 times
-
- Carcass Glue Up.jpg (104.08 KiB) Viewed 22935 times
Chris
A Pox Upon the Veneer!
Uggh, not the cleanest / best part of the job.
I've kept the factory plywood back-panel, since it has to have stable dimensions. The outer oak play was mostly gone, so I'm cleaning/scoring the under-layer and adding fresh veneer. Well, it's OK, but it's had bubbles that I needed to pierce and re-glue.
I'll forget about that trouble when the next trouble comes along .
.
[ATTACH]22031[/ATTACH]
I've kept the factory plywood back-panel, since it has to have stable dimensions. The outer oak play was mostly gone, so I'm cleaning/scoring the under-layer and adding fresh veneer. Well, it's OK, but it's had bubbles that I needed to pierce and re-glue.
I'll forget about that trouble when the next trouble comes along
[ATTACH]22031[/ATTACH]
- Attachments
-
- Back Veneer.jpg (111.61 KiB) Viewed 22878 times
Chris
Thank you! Work is coming along. For the chests I've worked on, the several drawers have dados on their side-walls. The cases usually have strips of hardwood to mate with the drawer-dados. However, one chest I worked on had some metal bars nailed to the case walls.jere wrote:Great work! So much so I think I am going to try making a box like yours. I don't have anything close to your experience, do you have any pointers? Also, how do the drawers slide in the main box? I don't see any slides like in a kitchen drawer/metal toolbox. Are there carved tracks maybe?
Due to the wood interface, these drawers have a nice sensory aspect when you move them, sort of a silky feel.
Chris
For the vintage models I've worked on, all the drawers can come all the way out. I have read somewhere that modern production at Gerstner & Sons has a drawer-retainer feature to address complaints of drawers falling out, but I've not yet seen one in person.danscot wrote: Are the drawers designed to be pulled out completely or are there stops of some kind to prevent that?
I also think the modern Gerstner production has diversified in terms of drawer sizes. There are probably less people out there with dozens of metal-working cutters and mills, and more folks having other types of collections. I know my one nephew keeps a bunch of authentic Zippo lighters in his chest.
Chris
Tarnation! and more gluing
Now more progress, but some of my mistakes are coming after me....
Here is the hardwood reinforcement I'm doing on the big drawer's dado runners. I use a 1/4" drill lightly wrapped in wax-paper to help align the new stock:
[ATTACH]22083[/ATTACH]
I had become a fan of using brown Briwax to accentuate the open grain of Oak. Not bad in so far as that goes, but the new bookmatched Coffeetree front-panel had some planing insufficiencies that I've now highlighted for the next 50 years . TAR- nation! Anyway, hardware riveting and felt-gluing is coming along....
[ATTACH]22084[/ATTACH]
Here is the hardwood reinforcement I'm doing on the big drawer's dado runners. I use a 1/4" drill lightly wrapped in wax-paper to help align the new stock:
[ATTACH]22083[/ATTACH]
I had become a fan of using brown Briwax to accentuate the open grain of Oak. Not bad in so far as that goes, but the new bookmatched Coffeetree front-panel had some planing insufficiencies that I've now highlighted for the next 50 years
[ATTACH]22084[/ATTACH]
- Attachments
-
- Drawer Runner Reinforcement.jpg (61.96 KiB) Viewed 22708 times
-
- Top Felt Gluing.jpg (107.68 KiB) Viewed 22701 times
Chris