I've searched the forum and can't find what I'm looking for.
Does anyone have a link to a picture of the SS Sharpening Jig mounted on an extension table? I know I've seen a picture somewhere (but maybe not on this forum). The setup is made by attaching the jig to a piece of plywood and clamping the plywood to the extension table but I can't find a picture.
Mounting the Sharpening Jig
Moderators: HopefulSSer, admin
Mounting the Sharpening Jig
----------------------------------------
Leonard
La Vernia, TX
Wood Goods - Custom Woodwork
EMAIL: woodgoods "at" lavernia "dot" net
PowerPro 520, PowerPro 500 (was my father's 500), SS jointer, SS Mark V mount planer, SS bandsaws (2), belt sander, scroll saw, SS jig saws (2), strip sander, Jointech system, 12" Delta Compound Miter Saw, a small collection of routers, a router table and a Delta Unisaw. All in a 24' x 24' shop.
I believe what you are looking for is in the section on sharpening in PTWFE. I am waiting for it to load as I type this. My computer has gotten terribly slow.
http://www.woodshoptips.com/tips/070102/index.htm
Maybe not; not if the jig is to be mounted on a board. I see no such board though it is shown mounted on an extension table.
They demo chisel sharpening in Sawdust Session #4 (Sept 29, 2007) but not on the extension table.
http://www.shopsmithacademy.com/SS_Arch ... hisles.htm
MarkFive510
Fixit,fixit wrote:I've searched the forum and can't find what I'm looking for.
Does anyone have a link to a picture of the SS Sharpening Jig mounted on an extension table? I know I've seen a picture somewhere (but maybe not on this forum). The setup is made by attaching the jig to a piece of plywood and clamping the plywood to the extension table but I can't find a picture.
I use the sharpening jig on a board that I cut a mitre slot in that is clamped to the extension table of the SS. I found that the mitre slot in a board gave me better positioning of the sharpening jig and I just hate to drill holes in my extension table. I will try and post a pic of my setup.
ldh
I just bought the sharpening jig. It came with a template for drilling into the extension table for mounting. But, like Idh, I don't think I want to do that. I look forward to Idh's photo.
The other alternate is to mount it on the main table using the left side miter slot. This is how Rick demonstrated the sharpening at the TA I attended in May.
The other alternate is to mount it on the main table using the left side miter slot. This is how Rick demonstrated the sharpening at the TA I attended in May.
Pat
Oregon
1992 SS 510, 11" Bandsaw on power station, 4" jointer, Pro Planer, Incra Miter 2000, Incra Ultimate Fence Router Pkg, Grizzly 6" Parallelogram Jointer.
Oregon
1992 SS 510, 11" Bandsaw on power station, 4" jointer, Pro Planer, Incra Miter 2000, Incra Ultimate Fence Router Pkg, Grizzly 6" Parallelogram Jointer.
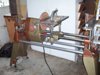
This is the simple jig that I use to attach the SS sharpening attachment to my Mark V. It is made up of three pieces of 1/2" ply glued together to form a mitre slot for the sharpening attachment and then clamped to the extension table. The pics are not real sharp, but frankly I am not real sharp this morning. Hope it helps.
ldh
ldh
- Attachments
-
- Sharp1.JPG (107.58 KiB) Viewed 31676 times
-
- Sharp2.JPG (91.54 KiB) Viewed 31641 times
-
weelildaddy
ldh: Thank you for posting your jig. I drilled my table as recommended but it gives me no room for adjustment. Your jig is so simple and allows for infinite adjustment if necessary and is so quick. Having to remove the plastic miter bar and reassemble screws through the table and then still have an immovable object was a real chore. I'm going downstairs right now and build one.
Arno
Arno

-
johnmccrossen
- Gold Member
- Posts: 173
- Joined: Wed Feb 21, 2007 8:09 pm
- Location: Washington
Fixit,
I made one like ldh shows in his pics. I learned about it from Rick Davis at a TA session. I drilled some matching holes in the jig and can also attach it to my saw and jointer fences (although I haven't tried this part yet). The slot works for holding feather boards.
I cut the slot in the jig on the Mark V set up as a router. It took a couple of tries and was good practice but need to be really careful.
John McCrossen
John McCrossen
Everett, Wa.
1954 Mk 5 SN 269454, 1955 Mk 5 SN 316013, 1960 Mk 5 SN 360792, 1962 Mk 5 SN 380102, Magna band saw, (2) jointers, (1) belt sander, (1) air compressor, (1) jig saw, (1) strip sander, (1) 20" scroll saw, DC 3300 dust collector, Sawsmith RAS, Craftsman table saw, 13" DeWalt planer, Triton 3 1/4 HP plunge router & table
-
Ed in Tampa

- Platinum Member
- Posts: 5829
- Joined: Fri Jul 21, 2006 12:45 am
- Location: North Tampa Bay area Florida
fixit wrote:I've searched the forum and can't find what I'm looking for.
Does anyone have a link to a picture of the SS Sharpening Jig mounted on an extension table? I know I've seen a picture somewhere (but maybe not on this forum). The setup is made by attaching the jig to a piece of plywood and clamping the plywood to the extension table but I can't find a picture.
I think when I got my sharpening jig SS suggestted mounting it to the plywood instead of directly on to the extension table. I have never used it on the main table with the plastic mitre bar guide.
I mounted mine on a piece of wood that was the same size as an extension table and used the included template to drill the holes to fasten it to the board.
When I grind using the main table I simply clamp the board to the table and grind. When I want to use the left side I clamp the board to the extension table. I usually allow the board to protrude off the table toward the disk to insure that either the main table or extension table doesn't get ground.
I drilled a hole in the board and hang the whole assembly on the wall when not in use.
Ed