Page 1 of 2
Shadow box picture frame.
Posted: Thu Jan 31, 2019 4:47 pm
by rjo946
How do I set up the shopsmith to cut the grove for the glass in the back of the frame?
Re: Shadow box picture frame.
Posted: Thu Jan 31, 2019 5:14 pm
by JPG
We need to know more about the shape of the frame and whether you are using the saw or a router.
Re: Shadow box picture frame.
Posted: Thu Jan 31, 2019 5:48 pm
by dusty
Is the frame already assembled? Is it a simple retangular frame? Is the frame made of something like crown molding?
Re: Shadow box picture frame.
Posted: Thu Jan 31, 2019 6:37 pm
by rjo946
I'm using the saw. Trying to make the frame that is in the woodworking system book. Using compound angle cuts. Wood is cut but not put together.
Re: Shadow box picture frame.
Posted: Thu Jan 31, 2019 6:44 pm
by jsburger
rjo946 wrote:I'm using the saw. Trying to make the frame that is in the woodworking system book. Using compound angle cuts. Wood is cut but not put together.
When you say "Shadow Box" is this what you are talking about?
Re: Shadow box picture frame.
Posted: Thu Jan 31, 2019 6:48 pm
by dusty
rjo946 wrote:I'm using the saw. Trying to make the frame that is in the woodworking system book. Using compound angle cuts. Wood is cut but not put together.
If the book you are using is Power Tool Woodworking for Everyone, the chart in there works well. The problem that you might encounter is getting the table tilt and miter gauge angles set accurately enough to achieve good joints.
Make a bunch of practice cuts before you start on good lumber.
Re: Shadow box picture frame.
Posted: Thu Jan 31, 2019 7:05 pm
by rjo946
It's angled.
Re: Shadow box picture frame.
Posted: Thu Jan 31, 2019 7:05 pm
by rjo946
I'll check that one out. Thanks.
Re: Shadow box picture frame.
Posted: Fri Feb 01, 2019 2:24 pm
by edflorence
It is generally easier to shape the molding, including any rabbets and grooves on the back side, while the molding is still in long sticks. If you have already cut the molding into shorter pieces, it should still be possible to set the saw to cut a groove into the pieces one at a time. You can cut the groove using a dado set or dado blade or by using the quill extension. Take a pass, nudge the quill ahead a blade width, take another pass and so on until the groove is the right width.
As far as cutting compound miters, the chart in PTWFE seems to be accurate, but there may be an easier way to do the job. You can build a simple miter box consisting of two parallel sides and a bottom, making the distance between the parallel sides whatever it takes to get the molding wedged between them at the correct tilt angle. Then set your miter gage at 45 degrees and run the molding in the miter box through the saw. I know this is not a thorough or even very good description of the process, but hopefully you get the general idea. There are lots of good videos on line that show how its done. The beauty of doing it this way is that you avoid tilting the table. The method of tilting the table and angling the miter gage works, but introduces complexities, like dealing with the cut-off on the uphill side of the saw and the difficulty of adjusting the table and the miter gage to fractions of degrees.
Just a thought, but you can also use a good old-fashioned miter box and back saw. Some might consider this heresy, but hey, its all woodworking. I recently cut a crown molding that was 4 inches wide, which meant that I could not make the cut completely through with the Shopsmith, so I cut the last half inch or so with a Stanley miter box. Worked great.
Hope some of this is helpful.
Re: Shadow box picture frame.
Posted: Sat Feb 02, 2019 11:43 pm
by edflorence
After my last post I remembered that I had taken some pictures of both described processes and thinking that each picture is worth at least 10k more words, here they are.
One other second thought: any molding wider than 4 inches will have to be cut on the flat, so the miter box won't work, as the capacity of the saw is exceeded. So, either tilt the table and angle the miter gage, or use a compound miter saw or build a miter box with really tall sides. The compound miter saw would be handy, but no room for it, which is why Shopsmith in the first place.
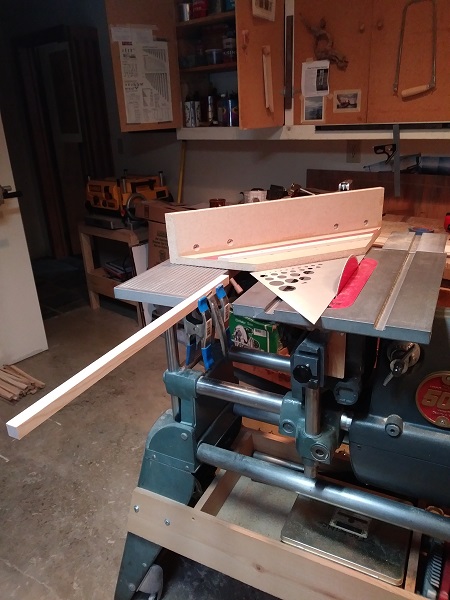
- compound miter with miter box.jpg (109.19 KiB) Viewed 28149 times
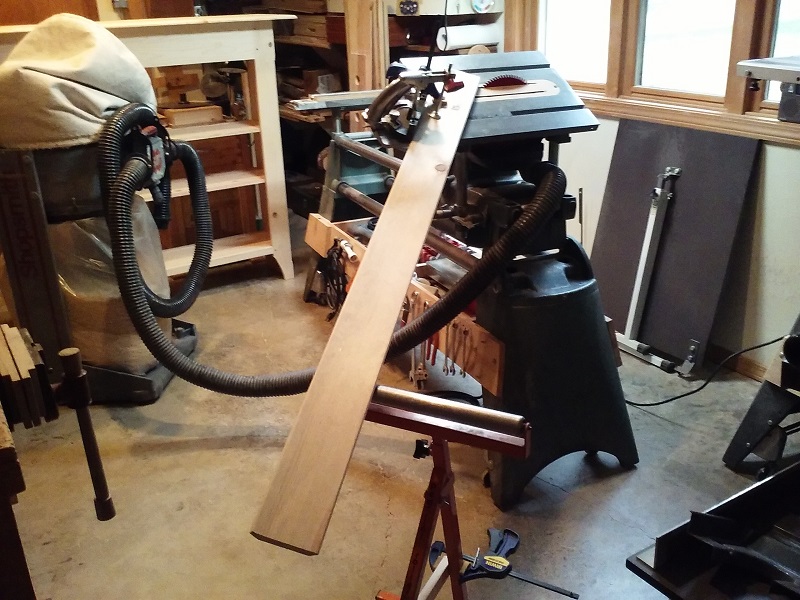
- compound miter on long wide molding.jpg (186.25 KiB) Viewed 28149 times