Page 1 of 4
Bandsaw Overhaul
Posted: Fri Dec 06, 2019 1:56 pm
by Steele510
Recently acquired a used bandsaw, now overhauled, new bearings, new tires, new cool blocks, new handle (yes, that is indeed a stubby red screwdriver handle as a replacement), cleaned, lubed, aligned and tested. I couldn’t be happier. Runs super quiet.
If anyone has any ideas, comments, suggestions or questions I'd be happy to discuss. Thought these pics may help others.
Figure 1 Condition Before, as received

- before.jpg (123.47 KiB) Viewed 22555 times
Figure 2 New Bearings, New blade, New Tires, etc...

- IMG_0199-756x1008.jpg (130.33 KiB) Viewed 22555 times

- IMG_0198-756x1008.jpg (99.03 KiB) Viewed 22555 times

- IMG_0193-756x1008.jpg (126.5 KiB) Viewed 22555 times
Figure 3 Gluing New Tires – Easy (copper pipe soldered to an air fitting)
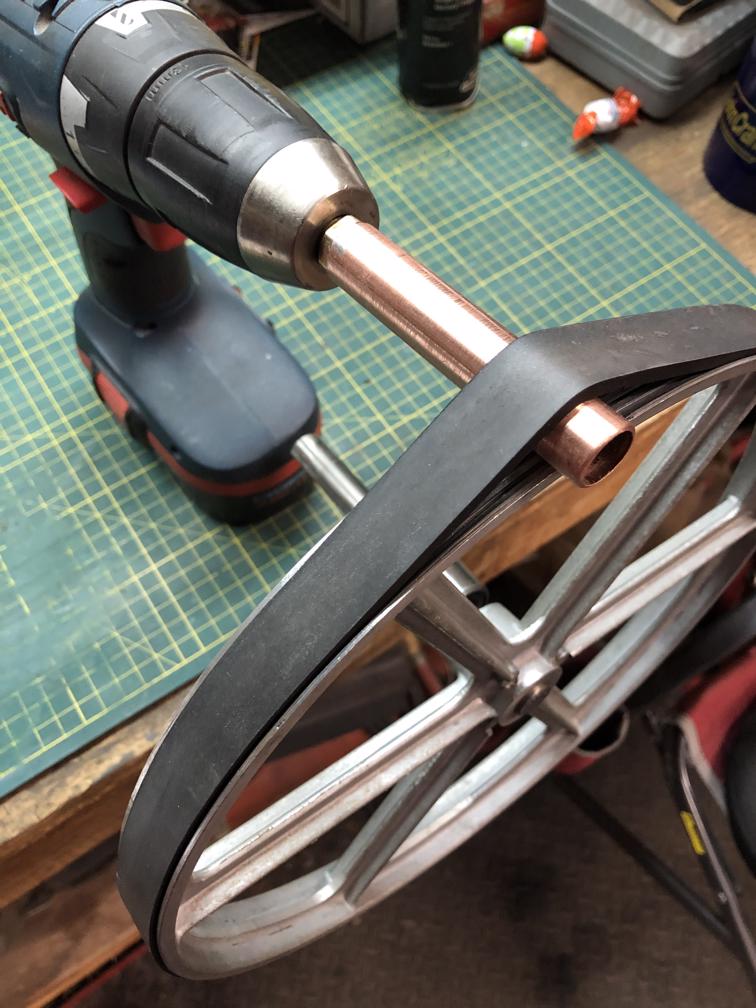
- IMG_0197-756x1008.jpg (107.21 KiB) Viewed 22555 times
Figure 4 Initial 2 minute Testing (oops, the drawer is upside down)

- IMG_0202-756x1008.jpg (147.56 KiB) Viewed 22555 times
Re: Bandsaw Overhaul
Posted: Fri Dec 06, 2019 6:38 pm
by jsburger
Very nice job!!!
Re: Bandsaw Overhaul
Posted: Fri Dec 06, 2019 6:40 pm
by beeg
How did ya install the red handle? How did the copper pipe work out for installing the new tires?
Re: Bandsaw Overhaul
Posted: Fri Dec 06, 2019 8:41 pm
by Steele510
beeg wrote:How did ya install the red handle? How did the copper pipe work out for installing the new tires?
Hey Beeg, I was originally planning on turning a replacement knob from wood and painting it red, then I remembered I have inherited a few hundred screwdrivers over the past couple years. The short red driver was the perfect solution. Heated up the metal shaft with a torch until it softened its grip a bit and pulled it out easily with pliers. Drilled appropriately tight fitting hole (careful not to drill through the closed end) to mount on the existing SS cam handle bar. Added some adhesive, it will outlast me. Simple solution and it works great.
I bought the SS rubber tires and adhesive. The tires mounted easier than I expected, and the copper tubing made gluing them up quite easy as well. I soldered the tube in an air fitting to mount in in my cordless drill. Spin the copper tube all the way around to re-tension the rubber equally first and make sure it fits well. Add glue carefully (I warmed it up a bit to make it flow) and turn the copper tube as you go around. You know when you get all the way around because the copper tube starts slipping in the glue where you started. Clean up with paint thinner, set the rubber down firm and done. Both wheels took less than 45 minutes to complete I'd say. Also important to note that I cleaned up the old rubber from the wheels completely, using a pneumatic die grinder with soft brass wire wheel. I think that is a must-do to get the new tires to run in their correct position.
Re: Bandsaw Overhaul
Posted: Fri Dec 06, 2019 8:54 pm
by algale
Looks better than new.
Re: Bandsaw Overhaul
Posted: Fri Dec 06, 2019 10:28 pm
by Shawn
Looks very nice. I just replaced the bearings on one of my bandsaws with the Shopsmith kit, but I have quite a bit of noise coming from the upper wheel.
Here are my questions if you can help:
How did you lubricate these needle bearings? What kind of grease did you use? How did you apply it? How much did you use?
Re: Bandsaw Overhaul
Posted: Sat Dec 07, 2019 7:09 am
by Steele510
Shawn wrote:Looks very nice. I just replaced the bearings on one of my bandsaws with the Shopsmith kit, but I have quite a bit of noise coming from the upper wheel.
Here are my questions if you can help:
How did you lubricate these needle bearings? What kind of grease did you use? How did you apply it? How much did you use?
Shawn, no doubt the bearing upgrade will be substantially better than the original bushings. This saw was missing the tracking bearing completely so the upgrade was a must-do.
If the needle bearings are damaged there is no amount of grease that can fix it. For mine the upper wheel bearings seemed okay but were dry from age and dirty. I used marine grease (blue) as I believe the higher viscosity and its ability to resist moisture is well suited for the needle bearing. Applied liberally with the tip of a small screwdriver. I made sure the needles were rolling properly and well lubed. Remove all excessive squeeze out once installed. Exposed grease in a bandsaw is bad news as it collects a lot of dust quickly. Not sure if anyone has a bearing cross over part number, installing a replacement wouldn’t be difficult. SS only sells the replacement wheel I believe.
Re: Bandsaw Overhaul
Posted: Sat Dec 07, 2019 3:15 pm
by Shawn
Thank you for the answers and extra information. I did not have much grease that wasn't all dried out available, so I used what I had and it worked its way in, but I think I need a little more. Nothing appears seized up, they appear to roll, but still got a bit of noise.
I have a couple more questions though in case I need to replace the bearings:
There are two bearings in the wheel, one on each side. They appear to either be press fit into the casting, or maybe just pressed to be flush on each side of the wheel (there is a gap between the two in the middle, they do not butt up against each other). Would they be able to be pressed out? I don't have a press, I suppose I could use the old socket trick. Wondering if that might be why Shopsmith would sell the whole assembly vs. selling the parts? That, or they would sell the parts, but people could not press out the old bearings.
As far as a cross for the bearings, the numbers are "SCE88" 1NA USA (if my eyes are telling me the truth) on the upper wheel bearings and they appear to be available for purchase online from other retailers if not available from Shopsmith.
My main bandsaw apparently had the upgraded style of bearings, so I will probably transfer my old ones over to a different bandsaw. I bought a second Shopsmith so that I could have a second headstock to do a DIY upgrade. It came with a bandsaw that needs quite a bit of TLC. I will try and photo document refurbishing that one when I get around to repairing it. I will probably transfer my old cast iron table over to that once since I added the aluminum one one to my main one.
Re: Bandsaw Overhaul
Posted: Sat Dec 07, 2019 4:56 pm
by P89DC
I rehabbed a older bandsaw that had the old rubber bushing instead of bearings. Got it running real nice with a 1/2" blade. I was going to sell it but it runs so nice and I have room...so now I have two bandsaws.
Were you interested in a dust port or viewing port. I added them to both.
Re: Bandsaw Overhaul
Posted: Sat Dec 07, 2019 5:25 pm
by Steele510
You have better eyes than I do! I'm glad you brought that up, I did find a thread that listed the same bearing info you gave. Pressing the old bearings out would be easy, installing the new ones would require a needle bearing tool. These are small, full compliment drawn cup needle bearings. Installing them would need a press (not a hammer) and careful attention not to damage them.
bearings (needle roller)
Bandsaw Upper Bearing Part Number
I noticed on the other thread that Bill also mentioned a grease fitting, that's a great idea as well.