Gallery of Restorations
Moderators: HopefulSSer, admin
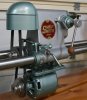

Seven bought used or Reactivated....
1st: 520 S/N 060399 Wendy
2nd: 500 S/N 366722 Bonnie - Upgraded to Poly V belt 4S
3rd: 500 S/N 203145 Roy
4th: 510 S/N 370365 JAG - Delivered to Santa Rosa
5th: 520 S/N 010702 Dave
6th: 500 S/N 286664 Pete - Sold on C/L
7th: 500 S/N 379638 Tom - 4S
Bonnie:
[ATTACH]10639[/ATTACH]
JAG:
[ATTACH]10638[/ATTACH]
Pete:
[ATTACH]10637[/ATTACH]
Tom (Before):
[ATTACH]10636[/ATTACH]
- Attachments
-
- ss Mckenna.jpg (6.48 KiB) Viewed 17161 times
-
- 50621374.JPG (38.14 KiB) Viewed 17166 times
-
- 370365.JPG (42.97 KiB) Viewed 17169 times
-
- 366722 After.JPG (46.04 KiB) Viewed 17170 times
MK V 520; MK V 510 w/PP DIY Upgrade; MK 5 500; Jointer; Bandsaw; Sliding Table; Conical Sanding Disk; Sharpening Guide, Lathe Duplicator, Jigsaw, Scrollsaw, Beltsander, Ring Master, Biscuit Joiner.

1962 Goldie SN 373733
[attach]12086[/attach]
[attach]12087[/attach]
[attach]12088[/attach]
[attach]12089[/attach]
[attach]12090[/attach]
From a relic not run in 20 years, a gift from my dad, to a fully functional Mark 5. This is my first restoration of a machine. Couldn't have done it without the kind folks here.
[attach]12087[/attach]
[attach]12088[/attach]
[attach]12089[/attach]
[attach]12090[/attach]
From a relic not run in 20 years, a gift from my dad, to a fully functional Mark 5. This is my first restoration of a machine. Couldn't have done it without the kind folks here.
- Attachments
-
- 1.JPG (169.73 KiB) Viewed 17046 times
-
- 2.JPG (161.89 KiB) Viewed 17045 times
-
- 5.jpg (125.03 KiB) Viewed 17044 times
-
- DSCF2691.JPG (164 KiB) Viewed 17048 times
-
- DSCF2706.JPG (172.54 KiB) Viewed 17044 times

-
JPG

- Platinum Member
- Posts: 34643
- Joined: Wed Dec 10, 2008 7:42 pm
- Location: Lexington, Ky (TAMECAT territory)
I have a feeling that if you use it for 20-25 years it will not then be a 'relic'!:)ddvann79 wrote:Thanks, Dusty. Hopefully in 20 -25 years I will still be using the relic.
╔═══╗
╟JPG ╢
╚═══╝
Goldie(Bought New SN 377425)/4" jointer/6" beltsander/12" planer/stripsander/bandsaw/powerstation /Scroll saw/Jig saw /Craftsman 10" ras/Craftsman 6" thicknessplaner/ Dayton10"tablesaw(restoredfromneighborstrashpile)/ Mark VII restoration in 'progress'/ 10E[/size](SN E3779) restoration in progress, a 510 on the back burner and a growing pile of items to be eventually returned to useful life. - aka Red Grange

Restoration is complete
What started out as a general maintenance on my 1955 Greenie, ended up to be a full restoration. When I started to clean and lube the the headstock, I found two bearing that were going bad. So it was time to do a complete headstock rebuild. While the headstock was apart it was a good time to strip and paint the frame. I painted the headstock Hammered Gray and Verde Green and the rest of the parts Verde Green. I was able to get paint from my local BB store. Made it into a shorty as I have two SS in my shop. Here are pictures of before and after. 
[ATTACH]12369[/ATTACH]
[ATTACH]12370[/ATTACH]
[ATTACH]12369[/ATTACH]
[ATTACH]12370[/ATTACH]
- Attachments
-
- IMG_0405.jpg (155.12 KiB) Viewed 16961 times
-
- P1010001_1.jpg (140.6 KiB) Viewed 16976 times
-
JPG
- Platinum Member
- Posts: 34643
- Joined: Wed Dec 10, 2008 7:42 pm
- Location: Lexington, Ky (TAMECAT territory)
That is a good looking "A" headstock! The rest looks good also!wingrider wrote:What started out as a general maintenance on my 1955 Greenie, ended up to be a full restoration. When I started to clean and lube the the headstock, I found two bearing that were going bad. So it was time to do a complete headstock rebuild. While the headstock was apart it was a good time to strip and paint the frame. I painted the headstock Hammered Gray and Verde Green and the rest of the parts Verde Green. I was able to get paint from my local BB store. Made it into a shorty as I have two SS in my shop. Here are pictures of before and after.
[ATTACH]12369[/ATTACH]
[ATTACH]12370[/ATTACH]
╔═══╗
╟JPG ╢
╚═══╝
Goldie(Bought New SN 377425)/4" jointer/6" beltsander/12" planer/stripsander/bandsaw/powerstation /Scroll saw/Jig saw /Craftsman 10" ras/Craftsman 6" thicknessplaner/ Dayton10"tablesaw(restoredfromneighborstrashpile)/ Mark VII restoration in 'progress'/ 10E[/size](SN E3779) restoration in progress, a 510 on the back burner and a growing pile of items to be eventually returned to useful life. - aka Red Grange
╟JPG ╢
╚═══╝
Goldie(Bought New SN 377425)/4" jointer/6" beltsander/12" planer/stripsander/bandsaw/powerstation /Scroll saw/Jig saw /Craftsman 10" ras/Craftsman 6" thicknessplaner/ Dayton10"tablesaw(restoredfromneighborstrashpile)/ Mark VII restoration in 'progress'/ 10E[/size](SN E3779) restoration in progress, a 510 on the back burner and a growing pile of items to be eventually returned to useful life. - aka Red Grange
Thanks for the complement! I sandblasted it before I painted it. Used low pressure on most of it. Just high enough to take the old paint off but had to increase the pressure the clean the rust off the legs. It cleaned up very nice and didn't take to long to do. Total actual time spent working on the restoration was about 12 hours. I just worked on it when I had free time.JPG40504 wrote:That is a good looking "A" headstock! The rest looks good also!
-
JPG
- Platinum Member
- Posts: 34643
- Joined: Wed Dec 10, 2008 7:42 pm
- Location: Lexington, Ky (TAMECAT territory)
I have spent more than 12 hrs just trying to get some rusty parts to 'separate'.wingrider wrote:Thanks for the complement! I sandblasted it before I painted it. Used low pressure on most of it. Just high enough to take the old paint off but had to increase the pressure the clean the rust off the legs. It cleaned up very nice and didn't take to long to do. Total actual time spent working on the restoration was about 12 hours. I just worked on it when I had free time.
╔═══╗
╟JPG ╢
╚═══╝
Goldie(Bought New SN 377425)/4" jointer/6" beltsander/12" planer/stripsander/bandsaw/powerstation /Scroll saw/Jig saw /Craftsman 10" ras/Craftsman 6" thicknessplaner/ Dayton10"tablesaw(restoredfromneighborstrashpile)/ Mark VII restoration in 'progress'/ 10E[/size](SN E3779) restoration in progress, a 510 on the back burner and a growing pile of items to be eventually returned to useful life. - aka Red Grange
╟JPG ╢
╚═══╝
Goldie(Bought New SN 377425)/4" jointer/6" beltsander/12" planer/stripsander/bandsaw/powerstation /Scroll saw/Jig saw /Craftsman 10" ras/Craftsman 6" thicknessplaner/ Dayton10"tablesaw(restoredfromneighborstrashpile)/ Mark VII restoration in 'progress'/ 10E[/size](SN E3779) restoration in progress, a 510 on the back burner and a growing pile of items to be eventually returned to useful life. - aka Red Grange