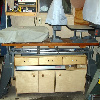
Here are a couple of pictures of a cart I'm making to house some Special Purpose Tools -- Bandsaw, Belt Sander, Jointer, and Strip Sander. It's patterned after Shipwright's model -- Thanks for the idea Paul M.
I just need to add a bit of finish.
The base is 24" x 36" and made from 2x4s joined at the four corners by half lap joints. The rest is made of 3/4" birch plywood -- used a bit over a full sheet and about half a sheet of 1/4" birch plywood. The three-drawer cabinet is 20" wide by 24" high. The Cherry drawer fronts are about 14", 6" and 4" high, with the drawer boxes sized accordingly to fit using 22" KV-type drawer slides. The drawer boxes also are 3/4 birch ply fronts, backs and sides, with 1/4" birch ply bottoms. The drawer parts were all glued together for strength. The back of the cabinet also is 1/4" birch ply.
I used birch banding to cover the edges of the plywood, attaching it with white glue and an iron for setting the glue.
Now I just need to get rid of some things in the shop (tools) so I'll be able to roll the cart somewhere.
[ATTACH]8782[/ATTACH]
[ATTACH]8783[/ATTACH]
[ATTACH]8784[/ATTACH]
Cart for Special Purpose Tools
Moderators: HopefulSSer, admin
Cart for Special Purpose Tools
- Attachments
-
- Cart1.jpg (31.82 KiB) Viewed 21175 times
-
- Cart2.jpg (31.36 KiB) Viewed 21165 times
-
- Cart3.jpg (34.76 KiB) Viewed 21163 times
Art in Western Pennsylvania
-
shipwright

- Platinum Member
- Posts: 1160
- Joined: Tue Dec 15, 2009 7:28 pm
- Location: Vancouver Island, Canada
- Contact:
-
friscomike

- Gold Member
- Posts: 157
- Joined: Wed Oct 31, 2007 11:49 am
- Location: Granbury, Texas
-
paulrussell

- Platinum Member
- Posts: 667
- Joined: Sun Apr 11, 2010 10:35 am
- Location: Dewitt MI
-
foxtrapper
- Gold Member
- Posts: 439
- Joined: Fri Feb 16, 2007 10:05 am
-
paulrussell
- Platinum Member
- Posts: 667
- Joined: Sun Apr 11, 2010 10:35 am
- Location: Dewitt MI
Me too. PennView: when can you drop it off at my place? :-Dfoxtrapper wrote:I like that.
Now you've made me have to rethink the hodge-podge method of storage I'm using right now for my various tools.
Paul
520 PowerPro, Planer, Bandsaw, Jointer, Belt Sander, 20" Scroll Saw, Dust Collector, conical disc
Also: 3D printers, and a homebrew CNC
520 PowerPro, Planer, Bandsaw, Jointer, Belt Sander, 20" Scroll Saw, Dust Collector, conical disc
Also: 3D printers, and a homebrew CNC
Thanks all!
I have a number of other photos I took while building the cart, but it was getting late yesterday when I started this thread and I didn't feel like resizing some other photos then to meet forum requirements. So if anyone is interested in some aspect of the cart assembly, let me know.
I have a number of other photos I took while building the cart, but it was getting late yesterday when I started this thread and I didn't feel like resizing some other photos then to meet forum requirements. So if anyone is interested in some aspect of the cart assembly, let me know.
Art in Western Pennsylvania
-
swampgator
- Platinum Member
- Posts: 1256
- Joined: Fri Nov 27, 2009 9:32 pm
- Location: Pensacola, FL