Build one or a set of these handy little tables in a single weekend
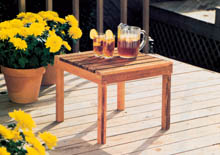
We used weather-resistant, rough sawn Western red cedar for our example table. Other great woods for outdoor use include pressure-treated lumbers (read their warnings about use around food), cypress, redwood and teak. Be sure to use a glue that’s designed for weatherproof, outdoor use for all your joints.
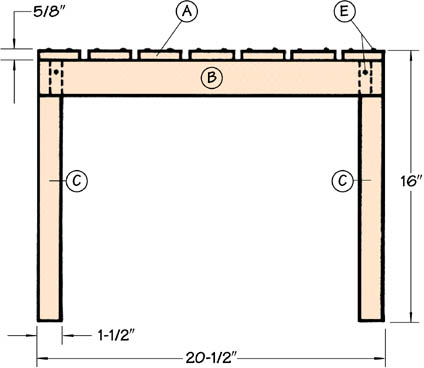
Step 1: Set your table saw rip fence to 2-1/2-inches and rip the stock required for the seven table top slats (A), according to the List of Materials.
Step 2: Move your rip fence to 2-inches and rip the stock required for the four side rails (B).
Step 3: Adjust your fence again to 1-1/2-inches and rip the stock for the four legs (C).
Step 4:Using simple cut-off stops, crosscut your stock to length for the top slats (A), side rails (B) and legs (C), according to the list of materials.
TIP: If you’re planning to make a table with components that are 24-inches long or shorter, Shopsmith’s optional
adjustable Extension Face attaches quickly to your Miter Gauge to provide added efficiency and precision when cutting duplicate workpieces.
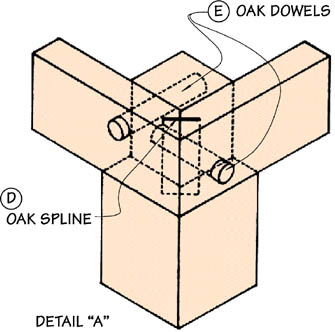
Step 5: Tilt your saw table (or arbor) to 45-degrees and cut the mitered corners for the ends of the side rails (see detail A).
Step 6: While at a 45-degrees tilt, adjust your saw’s depth-of-cut and cut the saw kerfs for the splines that are used to reinforce the mitered corners (see detail A).
Step 7: Carefully measure the width of the kerfs you just cut so you can make the splines (D) that glue into them as thick as your kerfs are wide.
Step 8: Using your drill press set-up, bore the 3/8-inch holes in the ends of the top slats (A) and the sides of the side rails
(B), where they attach to the legs (C).
Step 9: Dry assemble and clamp the side rails (B) together. Be careful to maintain squareness during assembly. Once
you’re confident of a proper fit, apply glue to the mitered ends, insert the corner splines and clamp the assembly together.
Step 10: Using a dado blade, cut the half-lap joints on two sides of each leg top (see detail A). Make them 2-inches high x 3/4-inch deep to accept your side rails.
Step 11: Glue and clamp the legs (C) into the four corners of the side rail assembly, as shown. Be sure everything is square.
Step 12: Once the glue has dried, use the dowel holes you drilled in the rail sides as guides while you bore the other half of your reinforcing dowel hole in the leg tops with a 3/8-inch bit and portable drill.

Step 13: Glue and clamp the top slats (A) to the side rails (B), using 1/2-inch wide spacer blocks at each end to keep
everything square and even during assembly. Once each slat is clamped firmly, move your spacers to the next
position and install the next slat.
Step 14: Once the slats have dried in position, remove the clamps. Using the dowel holes drilled in the slat ends as guides, bore the reinforcing dowel holes in the top edges of the rails with a 3/8-inch bit in your portable drill.
Step 15: Sand smooth and apply a finish, if you prefer. Remember that although outdoor woods usually require no finish, spar varnish or exterior grade polyurethane will provide added protection and longevity.

