Here’s the perfect opportunity for you to exercise your design creativity!

Just a generation or so ago, butcher blocks were as common in kitchens as ice boxes and wood- fired stoves. But, in the 40’s, 50’s and 60’s, modern kitchens started to get smaller. Out of necessity, these big, bulky blocks were replaced by space-saving, countertop cutting boards. And although today’s newer homes seem to be getting larger and larger (many have kitchens with enough space to park the family sport utility vehicle), there are still a lot of folks living in older homes with limited space. If this describes your kitchen, this special Table is for you.
The simple design of this Table returns the classic butcher block to the kitchen…and gives today’s most common, high-tech appliance — the microwave oven — a convenient, out-of-the-way place of its own. Or, if you prefer, you can build your table with our “storage option” which includes a slide-out drawer and “cubbyholes” for cookbooks, dishes, small appliances, etc.
Add casters to create a convenient, portable cutting surface, extra counter space or even a roll-around patio barbecue cart. Double or triple the size of the top and add an extra set of center support legs to turn it into a garden cart or even an extra workbench for the shop. The modifications and applications are limited only by your imagination.
Getting Started
The lumber requirements for the project as shown here include 11′-6″ of 2″ x 2″ stock, 27 board feet of 3/4″ thick stock and another 27 board feet of 1/4″ thick plywood. If you’ve decided to make the storage unit that sits in the microwave area on the lower shelf, you’ll also need a half-sheet of 1/2″ thick plywood. Start by cutting all your stock to size. The 2×2’s (actually 1-3/4″ x 1-3/4″) should be cut to exact length, while all the 3/4″ stock should be cut 1/16″ over actual width, then jointed to their exact width. The stock for the sides and back of the drawer should be resawed on the bandsaw, then jointed or planed to the final 1/2″ thickness. With the stock at its finished thickness and width, all the pieces should be crosscut to their finished length.
NOTE: Since all microwave ovens are not the same size, be sure to measure your oven, check it against the measurements included here and alter the sizes of any pieces as required to accommodate the oven.
The Leg and Rail Assembly

Before cutting the legs (A), decide whether or not you want to add casters to make your Table mobile. If so, be sure to make the legs 2″ shorter than called for in the plans or your table will be too high…then drill a hole in the bottom of each leg to receive the caster shaft or its drive-in, metal “receiver”.
Next, drill and counterbore the holes in the legs (A) for the screw shanks where the top & bottom side rails (B,C) top & bottom front and back rails (E, F) and shelf (G) attach to them. NOTE: If you’re making the stand to hold a microwave oven, be sure to position the lower shelf (G) 4″ lower than indicated in the plan to accommodate the height of the oven. Again, be sure to measure your oven before deciding where to position the shelf.

If you’re making the table with a lower storage unit instead, be sure to attach the two drawer guide strips (D) to the top side rails (B) with counterbored wood screws before putting the two leg assemblies together. See the drawer guide detail drawing.
Use a 1/8″ drill to bore screw pilot holes in the ends of all rails (B,C,E,F) and assemble the side rails (B,C) to the legs (A) using 1-3/4″ #8 flathead wood screws (Y). Cover the screw heads with dowel buttons or plugs (Z).
The Base Assembly

Put the base assembly together by connecting the two leg & rail assemblies with the top back (E) and bottom front & back (F) rails, using 1-3/4″ #8 flathead wood screws. As before, cover the screw heads with glue-in dowel buttons or plugs.
Build the shelf (G) by gluing individual pieces of 3/4″ stock edge-to-edge to create a piece that’s 22″ x 27-3/4″. Once the glue has dried, hand sand or belt sand the shelf to a smooth surface, then notch-out the corners of the shelf to fit snugly inside your legs, resting on top of the lower side (C) and lower front and back (F) rails. Position the shelf (G) on top of these rails (C,F) and use a 1/8″ bit to drill the screw pilot holes in the edges of the shelf (G).
The Drawer

The drawer slides in and out on two guides (D) that fit into mating grooves on the drawer sides (K). Use a dado blade setup to cut a 3/16″ deep x 3/4″ wide groove in each drawer side (K), as shown in the drawer drawing. These grooves will slip over the drawer guides.
Cut the remaining joinery in the various drawer components as shown in the drawing. Use your Shopsmith Router or Dado setup to form a 1/2″ deep x 1/2″ wide vertical rabbet in each end of the drawer front (H) — and a 1/4″ deep x 1/2″ wide vertical dado in each drawer side (K) to accept the drawer back (J). Then cut a 1/4″ wide x 1/4″ deep groove all the way around the bottom insides of the drawer sides (K), front (H) and back (J) to accept the 1/4″ plywood drawer bottom (L).

Drill and countersink holes in the drawer sides (K) for attaching the front and back, as shown. Drill a screw hole in the drawer front (H) for the drawer pull (AA). Assemble the drawer pieces with glue and 1-1/4″ #6 flathead wood screws (X).
NOTE: Do not glue the bottom in place.
The Knife Block

The knife slots in the knife block (M) are formed by cutting corresponding grooves in the two mating knife block pieces prior to assembly. We have provided some example sizes for the groove widths and overall size of the block. However, we recommend that you measure the widths of the knives you plan to slip into the block and adjust the groove widths as well as the overall size of your knife block to accommodate your knives. Cut each groove to a depth of 1/8″, giving you a 1/4″ wide slot, then glue the two pieces face-to-face with the grooves aligned. Mount the knife block to one of the side rails (B) with a 5/8″ thick spacer block (N) to compensate for the rail set-back.
THE BUTCHER BLOCK TOP

The top (P) is reinforced and its individual pieces aligned with threaded metal rods (S). After cutting the appropriate number of top pieces (P), use your drill press to bore a series of mating holes in each to accept your 3/8″ threaded rods (S). See Fig. 1.
IMPORTANT: Use a 1″ diameter bit to drill larger holes in the two outer-most pieces of your butcher block. These holes will fit over the nuts (U) and washers (T) that are used on each end of your threaded rods.

Assemble the top pieces using waterproof carpenter’s glue, epoxy or two-part resorcinol glue. Be sure the pieces are aligned properly before tightening the threaded rods to pull everything together. Be careful not to over-tighten, as this could starve the glue joints. Next, drill and counterbore the screw holes, as well as the holes for the 1″ diameter dowel handle in the two top facings (Q). Attach the facings to the assembled butcher block top (P) with 1-1/4″ #6 flathead wood screws (X). Use dowel plugs or buttons (W) to cover the screw heads. Using a belt sander, smooth the butcher block top (P) and top facings (Q). Glue the handle (R) into position.
FINAL ASSEMBLY
Transfer the screw holes in the edge of the rails (B) to the bottom of the butcher block top (P). Drill the screw holes, but wait to assemble the butcher block to the side rails until after you have finished the stand to match the décor of your kitchen. Be sure to use a non-toxic salad bowl finish, non-toxic oil finish, or Beeswax Salad Bowl Finish on the butcher block top. The remainder of the stand can be finished with any grease and water resistant finish such as polyurethane or lacquer.
Finally, using 1-3/4″ #8 flathead wood screws (Y), assemble the butcher block top (P) and two facings (Q) to the rails (B).


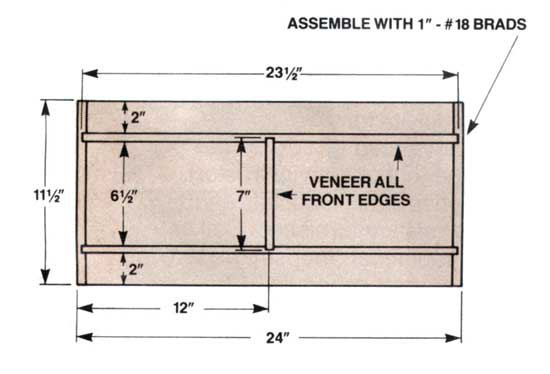
THE OPTIONAL STORAGE UNIT
If you’re not planning to use the lower shelf to hold a microwave oven, you can make good use of the space with this optional storage unit.
From a piece of 1/2″ thick plywood,, cut all pieces to size, according to the Bill of Materials. Use your dado set-up to cut the joinery, as shown in the storage unit drawings. Sand all pieces smooth and assemble them using glue and 1″ #18 wire brads (BB). Use nailset to countersink the brad head, then fill them with wood putty that matches the finish you’re planning to use. Cover the edges of the plywood with veneer tape or thin, solid wood strips and finish the storage unit to match the remainder of the table.