This classic toy always fascinates the
kids and never fails to sell

Here’s a toy that’s been around for generations. In fact, chances are, you had one of your own when you were a child. It’s great fun to play with and one of the best ways for parents to introduce the little ones to the true joys of woodworking at a young age, while giving them something other than the furniture to pound on when they need to relieve their childhood frustrations.
We built our bench from poplar, but maple, birch or virtually any hardwood would be a good choice. CAUTION: Due to the high propensity of plywood and man-made materials such as particleboard, MDF or flakeboard to splinter or crumble — and the fact that they do not turn well, we do NOT recommend using these sheet goods for this project.

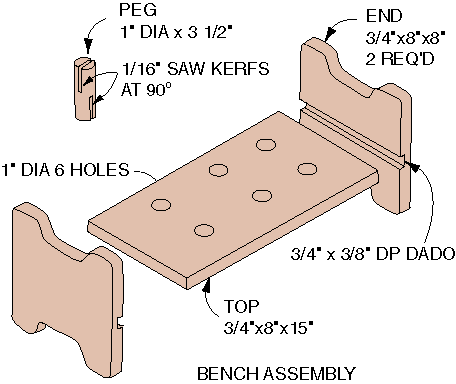
Start by cutting the benchtop and ends to size, as shown in the drawing. Next, configure your dado set to cut a 3/4″ x 3/8″ deep dado, centered in each of the two ends, as shown. Lay out the shape of the “feet” on the top and bottom of each end and cut these profiles out using your bandsaw or scroll saw. Use a small Drum Sander to sand the inside profiles of the “feet” smooth.
Lay out and use a 1″ brad point or 1″ Forstner bit to drill the peg holes in the benchtop. Use a small piece of fine grit sandpaper to smooth the edges of your holes ON BOTH SIDES of the benchtop. We wouldn’t want any splinter-caused boo-boos, for our little tots, would we? Sand all edges of the benchtop and ends to eliminate potentially dangerous splinters.
Next, we suggest that you turn the pegs three at a time. Be sure to make each blank 11-1/2″ to 12″ long to allow enough extra stock on each end of your blanks for your lathe centers. IMPORTANT: Be sure to stop frequently during turning to check the snugness of the fit of your pegs in the benchtop holes. If you make them too small, they’ll fall right through the holes…and if you make them too large, they won’t pound in, even with a sledge hammer!

Once you’ve turned the pegs down to their required 1″ diameter, use your bandsaw to saw them off to length. Then, tilt your bandsaw table to 45 degrees and using your bandsaw’s rip fence, miter gauge, or a strip of wood clamped to the table’s surface as a straightedge, make a “V-Block” setup to cut the relief kerfs half-way down each end of the pegs, offset 90 degrees to one another, as shown. Sand the ends and edges of the saw kerfs carefully to eliminate splinters.
Next, turn the mallet head and handle, as shown and sand carefully. You can attach the handle to the mallet head with a saw kerf-and-wedge approach like a conventional hammer, or by simply gluing the tenoned end of the handle into a stopped hole.
Finish sand all remaining pieces. To get rich, varied colors on the bench ends and pegs, mix non-toxic food colorings (two parts coloring with one part water) and apply them with a brush or rag. All pieces should be fully colored and dried prior to final gluing and assembly. Once everything’s glued-up and dried completely, apply a non-toxic seal coat such as liquid salad bowl finish, Preserve oil finish or a wax-type salad bowl finish to all parts.
$14.54Add to cart


