Five great designs for turned or sawn Ornaments
The Turned Ornaments
These ornaments can be made in a minimal amount of time and each can be uniquely crafted to an endless variety of designs. Here are three designs to get you started, along with some suggestions for other styles that could be equally marketable.
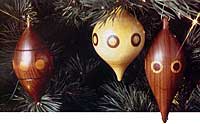
1: Using your Lathe, place a block of wood between centers and turn to a rough cylinder. Any size will do…we started with 2-1/2″ to 3″ square blanks, about 6″ long. You can use solid pieces of domestic or exotic hardwoods…or laminate contrasting pieces of stock together to create more striking designs.
2: For the plugged ornaments shown here, mark the locations for he plug holes around the circumference of your blank cylinder(s). To space the holes accurately, wrap a piece of 3/4″ wide masking tape around the cylinder and mark the two ends where they meet with a pencil. Unwrap the taps and stretch it out onto a flat surface. Use a ruler to measure off equal distances around your circumference.
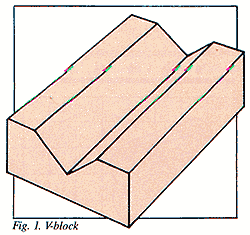
3: Replace the tape around the cylinder. Set up your MARK V Drill Press into a “V-Block” configuration by tilting the Worktable to 45-degrees and using your MARK V Rip Fence. If you’re using a conventional drill press, make a V-Block out of wood for this job (See Fig. 1). Another holding option is to use a Drill Press Vise with special “V-Cut” Jaws to hold the cylinders when boring these 3/4″ deep holes around the circumference of your blank cylinder to accept the contrasting wood plugs.
4: Use a Plug Cutter to cut the plugs from 3/4″ thick pieces of contrasting stock. Apply glue around the edges of your plug holes and use a non-marring mallet to tap the plugs into place. Allow the plugs to dry thoroughly before turning. NOTE: If a double inlayed plug is desired, drill a smaller hole through the center of the first plug and glue the appropriate sized contrasting plug (or dowel) into this new hole.
5: Turn the plugged cylinder to the desired shape and sand. Start with 100-grit sandpaper and work your way down to 220-grit to achieve a smooth surface.
6: While your turning is still mounted on the Lathe, apply the finish of your choice. For these ornaments, we used Preserve Oil Finish but you could also use an ordinary Paste Wax to achieve a satin-like finish.
7: Remove the Ornament from the Lathe and cut off the ends using a small Razor Saw to avoid splintering. lightly touch up the ends with fine sandpaper and apply your finish to these cut ends.
8: Drill a small hole for the Christmas Tree Hook. To add character, I make these hooks out of brass wire coated with brass lacquer (to prevent tarnishing).
Some Additional Thoughts:
· Once the ornaments are turned (prior to finishing) you can add dark accented lines around their circumference by holding a wire coat-hanger against the finished ornament as it turns on the lathe. The friction will “burn” the lines into your stock.
· Instead of inserting round plugs into your Ornaments as accents, try inserting square plugs into “square holes” you create with your Shopsmith MARK V Hollow-Chisel Mortising Attachment.
· Miniature Lathe Chisels or Pen Turning Chisels can be used to create extremely intricate designs around the circumference of your Ornaments

The Sawn Ornaments
Here are four traditional Holiday shapes that can be quickly scroll sawn (or bandsawn) to make great, highly marketable Christmas Tree Ornaments. We made ours from 1/4″ plywood, then painted them with the appropriate designs. However, Ornaments such as these made from attractive hardwoods such as cherry, walnut, birds eye maple, quarter-sawn oak or even some of the more attractive exotics will be just as marketable when left “natural” without painting.
1: Begin by preparing your stock to the appropriate thickness (1/4″) and approximate dimension.
2: Transfer the patterns shown here to stiff cardboard (or similar material) for use as templates.
3: Temporarily attach a stack of Ornament blanks together with Double-Stick Tape in preparation for pad sawing (sawing a stack of identically-shaped objects to shape at once). For a Scroll Saw, this is usually slightly less than 2″ (7 of our 1/4″ thick ornaments) – for the Shopsmith Bandsaw, we’d recommend stacking no more than about 12 of our 1/4″ thick ornaments.
4: Trace your pattern onto the top blank in your stack and cut the entire stack to shape at once.
5: Smooth the edges of the cut-out ornaments using a collection of Small Sanding Drums or a Strip Sander where possible. For really “tight” areas, use small files or hand sanding sticks made by gluing fine sandpaper to small diameter dowels.
6: If you’re planning to paint your Ornaments, start with an oil-based primer. Use a pencil to draw your designs on the primed surface then paint, as desired. Once dried, spray with a clear over-coat of polyurethane or varnish.
7: Drill a 3/32″ diameter hole where indicated in the plans and use decorative string or brass wire to hang them.

