Here’s a great project to hlep you be prepared for those upcoming Summertime deck or patio parties. Plan your operations carefully and you should be able to make a half dozen of them in a single weekend!
You’ve planned a cookout and your guests are scheduled to arrive in 15 minutes. You’ve already dragged that wobbly old card table out just one more time and set it up beside your picnic table on the patio or deck. But you still don’t have enough space for all your guests. So, you’re back in the house, scrounging around for more tables when the doorbell rings. You open the door and there they stand…as if they all arrived in a single bus. A quick count and your worst nightmare becomes reality…you have four more guests than places to seat them. Your four closest friends end up in folding chairs with paper plates full of food balanced precariously on their knees and barbecue sauce dribbling down their pant legs. GREAT!
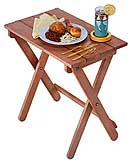
Next time, get those plates off their laps and give them a place to ENJOY their meals with these handy, fold-away party trays. Made of redwood (or any wood of your choice), they’re not only utilitarian, but beautifully designed and easy to build, too.
Getting Started
To build the project, you’ll need your MARK V (or a table saw) and jointer for making your sizing cuts (the jointer is optional)…a drill press (or your MARK V) for boring the bolt and screw holes…a bandsaw or scroll saw and a disc sander to round and smooth your parts.
HARDWARE
(2) 1/4 “-20 x 1-1/2” carriage bolts
(2) 1/4 “-20 x 2-1/4” carriage bolts
(4) 1/4 “I.D. flat washers
(4) 1/4 “-20 locking cap nuts
(26) #8 x 2″ roundhead wood screws
(28) #8 I.D. flat washers
(2) #8 x 1″ flathead wood screws
(8) #8 x 1-1/2″ flathead wood screws
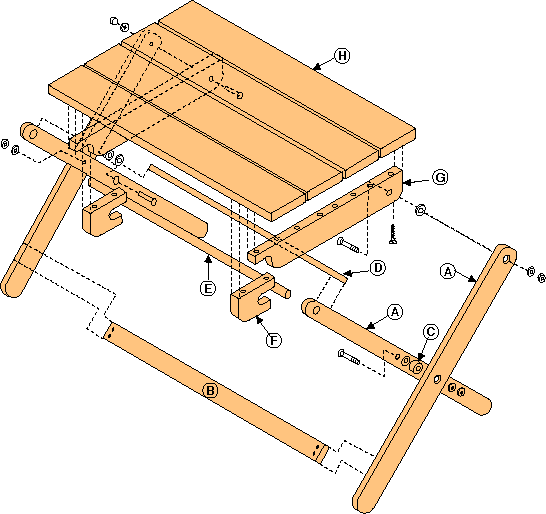
| A | Legs (4) | 3/4 x 2-1/8 x 28 |
| B | Lower Brace (1) | 3/4 x 2-1/8 x 22-1/2 |
| C | Spacer (2) | 3/4 x 1″ outside diameter |
| D | Upper Brace (1) | 3/4 x 2-1/8 x 19-1/2 |
| E | Dowel Brace (1) | 3/4 dowel – 19-1/2 long |
| F | Brace Lock (2) | 3/4 x 2-1/8 x 3-13/16 |
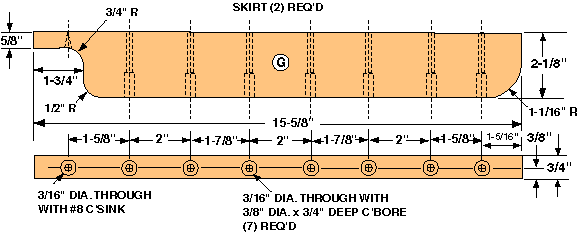
| G | Skirt (2) | 3/4 x 2-1/8 x 15-5/8 |
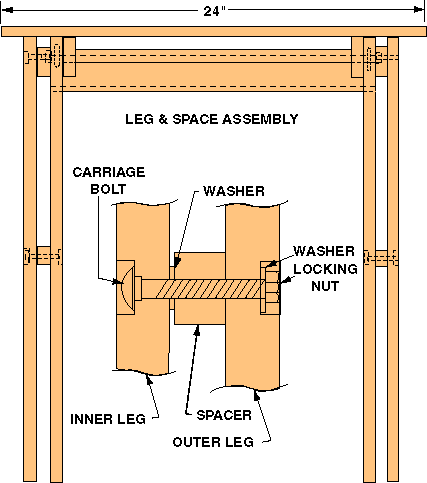
| H | Top (4) | 3/4 x 3-13/16 x 24 |
Component Construction
Before you get started, keep in mind that since all the tool set-ups for this project are so simple, it’s almost as quick and easy to go ahead and make six or so of these trays, while you’re at it. Making more is a simple matter of running additional lumber through your machinery. Of course, you’ll need a little extra assembly time too, but you’ll quickly discover that it’s a lot easier to make more trays now than to go back and re-do all your set-ups for another “run” at a later date. So, think about how many you might need and “do it now”. You’ll be glad you did.
Since our plan calls for outdoor use, we used redwood for our trays. It’s attractive, light in weight and resistant to decay. However, you could just as easily make these trays out of virtually any clear, attractive lumber. The choice is yours.
Start by using your table saw to cut all of your pieces (A,B,D,F,G,H) to size, as shown in the Bill of Materials. Rip everything to width first, making all your pieces just a “hair” oversized so you can run them over the jointer to smooth the edges prior to assembly…then crosscut them to length.
Cut out an extra piece, from which you will cut however many small, round spacers (C) you may need for the number of trays you plan to build. Use a pencil compass to draw a sufficient quantity (two per tray) of 1″ diameter spacers on this piece of stock.
Next, lay out the holes for the carriage bolts and dowel braces (E) in the four legs. Using a 3/4″ Brad Point Drill Bit, bore the through-holes for the dowel brace (E) and the 1/4″ deep counterbore holes (for the carriage bolts). Note that for each tray, two of the legs have a through hole at the top end…the other two legs have a counterbore at the top end…and all four legs have a counterbore near their centers.
A DRILLING TIP: If you’re using the MARK V drill press setup, set your rip fence to establish the hole centerline on your leg boards. Using the same 3/4″ bit, drill the through holes in the brace locks (F) that will form the back sides of the notches that will accept the dowel brace (E) when the trays are opened…and the 3/4″ internal radius at the left end of each Skirt (G) to accept the dowel brace when the trays are closed.
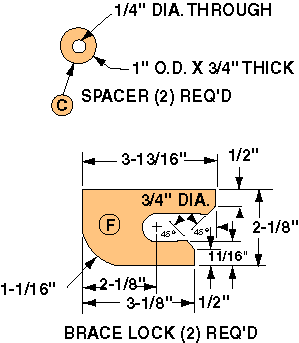
Change to a 1/4″ diameter brad point bit and drill the carriage bolt holes in all the legs. Use the recesses that were created by the tip of your 3/4″ brad point bit when you drilled your counterbores (or leave your rip fence at the same setup) to guide the positioning of these holes. Drill the center holes in the spacers (C) that you drew on your stock with a compass.
Bore the 3/16″ diameter (through) body holes and 3/8″ diameter (3/4″ deep) counterbores up through the bottoms of the skirts (G) and all the way through the un-notched ends of the brace locks (F) for your attachment screws.
Bore the 3/16″ diameter through holes in the ends of the upper and lower braces (B & D) — and the (1/2″ thick) top sides of the notched ends of the brace locks (F). Form shallow countersinks in these holes for the heads of your flathead attachment screws.

Use your bandsaw or scroll saw to cut out the round spacers; round the ends of the legs (A) and outside radius of the brace locks (F); create the notched and radiused skirt (G) ends; and form the 3/4″ wide notches in the brace locks (F).
Use your disc sander to smooth all outside radiuses…and a small drum sander to smooth your inside radiuses and brace lock (F) notches.
Assembly
Assemble each party tray using the hardware listed in the Bill of Materials. Use glue or not, as you see fit. If you do chose to use glue to reinforce the trays – and you’re planning to use the trays in an outdoor environment — be sure to use a weatherproof glue such as TiteBond II.
Begin by assembling the two leg sets with 2-1/4″ carriage bolts, locking cap nuts, washers and spacers. Tap the bolt heads gently into the counterbore to seat the square shanks and prevent bolt rotation during tightening. Be sure to leave enough “play” for the leg sets to pivot smoothly without wobbling when tightening. Connect the two leg sets together by attaching the upper (D) and lower (B) braces to the legs with #8 x 1-1/2″ flathead wood screws, as shown. Insert and glue the dowel brace (E), as shown. NOTE: Take care to be sure the leg sets are “square” when assembled.
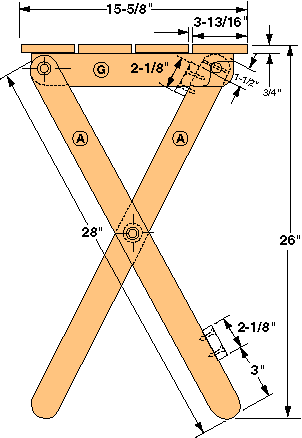
Attach the assembled leg sets to the skirts using two 1-1/2″ carriage bolts, flat washers and cap nuts…again, being careful to leave enough “play” for smooth operation without wobbling. Slide the bolts through from the inside of the skirts out and tap the bolt heads gently into the counterbore to seat the square shanks and prevent bolt rotation during tightening.
Assemble the top by laying the boards (H) on a flat surface and spacing them 1/8″ apart with scraps of 1/8″ masonite or corrugated cardboard. Use your assembled leg set to carefully position the skirts (G) and brace locks (F). Drop your #8 x 2″ roundhead wood screws into the pre-drilled holes in your skirts and tap their heads gently by using a nailset or pin punch to mark the locations for screw pilot holes in the undersides of your top boards (H). Use your drill press and a 3/32″ twist drill to bore 1/2″ deep pilot holes at all marked positions.
TIP: To be sure everything fits together properly, remove one top board at a time to drill these holes, then return it to your assembly area before drilling another top board. After drilling all of your pilot holes, return the skirts (G) to their appropriate positions and screw them to the top boards (H) from the underside using #8 x 2″ roundhead wood screws and flat washers (use glue or not, it’s your choice).
Screw the brace locks (F) into position inside the (inside) legs at the edge of the top opposite the side where the top leg pivot bolts attach through the skirts (G). See the photo of the woman holding the folded tray for reference. Use #8 x 2″ roundhead screws with washers for the radiused ends of the brace locks (F), and #8 x 1″ flathead wood screws for the notched ends.
Sand and finish each tray as you see fit. Happy partying !

