Here are three great kitchen tools that will take the work and guesswork out of pasta-making — and serve-up some nice profits at shows and craft fairs, too !
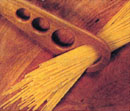
Mama Mia! These are some speecy-spicy pasta toolios . . . and you don’t have to be Italian to appreciate their timeless design, work-saving utility and money-making potential! So . . . who hasn’t . . .
- Made too much or too little pasta for an important meal?
- Watched helplessly as a half-pound of cooked pasta slipped out of the spoon you were transferring it with into a pile on the kitchen floor?
- Needed a place to cool a freshly-baked loaf of bread or quickly dry some home-made pasta or noodles?
These three handsome kitchen tools are the answer. Plus, they’re so fast and easy to make that you can afford to sell them at a price your customers will be quick to pay without a lot of thought (they’re great “impulse winners”) . . . and you’ll still make a hefty profit in the bargain.
Let’s get started!
Spaghetti Measure
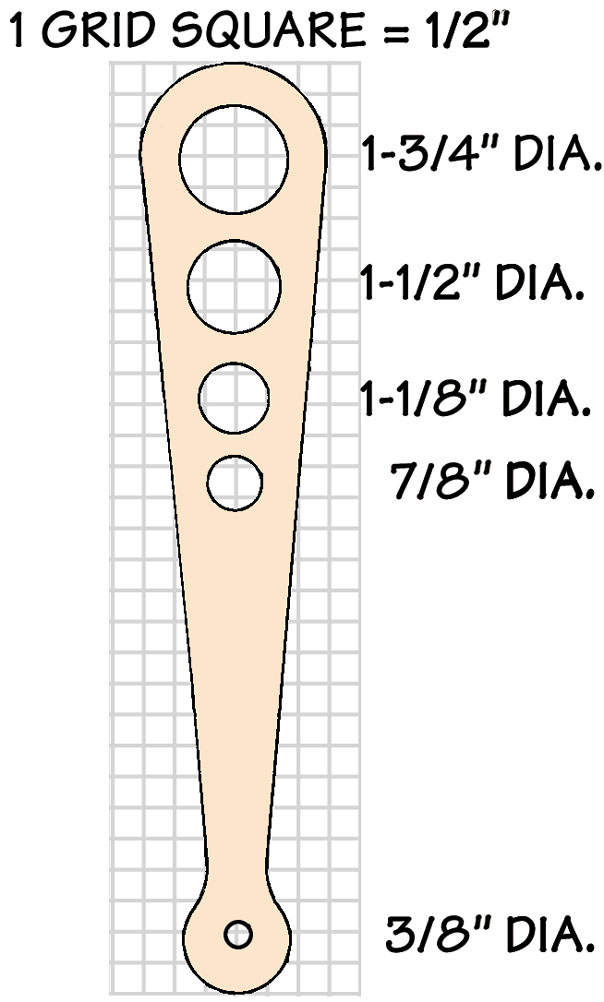
Making too much or too little spaghetti will cease to be a problem with this handy kitchen utensil. Just fill the one, two, three or four-serving holes with pasta to get the right amount, every time.
Start by making a stiff cardboard (or hardboard) template of the spaghetti measure pattern as drawn in the Spaghetti Measure Template. Be sure to drill 1/16-inch diameter center-marking holes at each of the five hole locations on your template.
Cut some 3/4-inch x 3-inch x 15-inch pieces of hardwood stock (we used cherry). Using the template you just made, trace the outside shape of the spaghetti measure onto your stock and mark your five hole centers.
Use your drill press and hole saws to bore the 7/8-inch, 1-1/8-inch, 1-1/2-inch and 1-3/4-inch holes in your stock. Don’t forget to drill the small, 3/16-inch dia. hanging hole.
Once you’ve drilled all the holes, use your bandsaw to carefully cut the overall shape and your drum sander to smooth the outside edges. Then go back to your bandsaw to resaw your 3/4-inch stock into two workpieces, about 3/8-inch thick before running each through your thickness planer (or over your jointer) to smooth the surfaces.
Now, use your Shopsmith Router Package with the 1/4-inch Router Chuck and a bearing pilot, 1/4” round-over Router Bit to round-over the outside and inside edges.
Finishing: We recommend that you use a non-toxic Salad Bowl Finish or other non-toxic finish of your choice for this project.
Pricing: When made out of domestic hardwoods such as cherry, oak or maple, the measure and fork should bring between $15 and $20 as a pair and the cooling rack $15 to $20 by itself! Make them out of more exotic woods and they’ll bring even more. In fact, why not offer a variety?
Pasta Fork
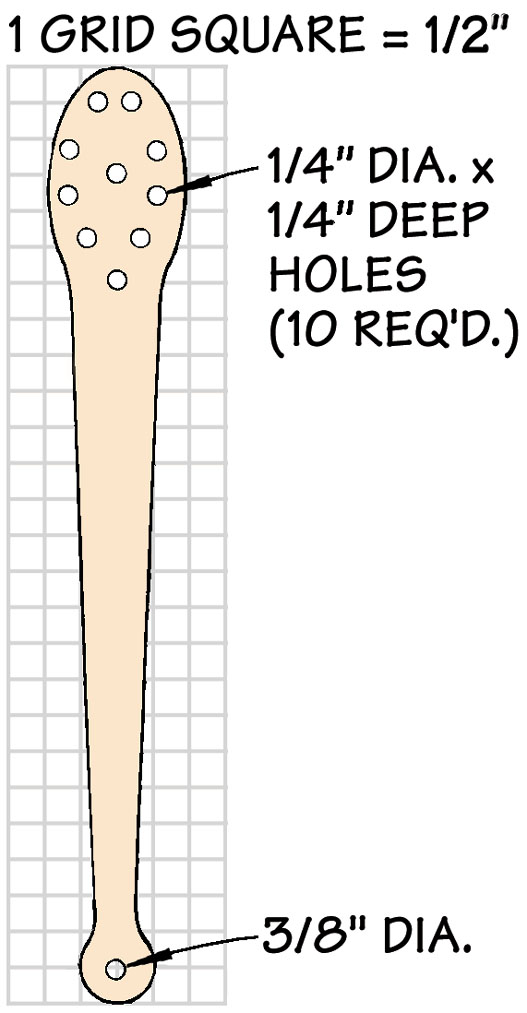
Most of us have already discovered that transferring pasta from the pot to the plate with a spoon (or even a cooking fork or pair of tongs) is a risky proposition, at best. Just when you think you’ve got a grip, you discover that you don’t.
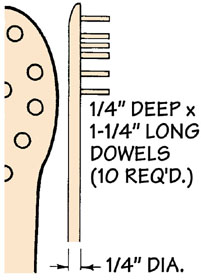
As with the Measure, start by making a stiff cardboard (or hardboard) template of the fork pattern as drawn in the Pasta Fork Template. Using the Pasta Fork Peg Template, drill 1/16-inch diameter center-marking holes at each of the 11 hole locations on your template.
There are two ways to make the fork. The first (and most efficient) is to start with a 5/4-inch thick piece of stock, drill all the holes, cut the outside shape, drum-sand them smooth, then resaw your stock to the 1/2-inch thickness before gluing dowels of a contrasting color into the 10 peg holes and sanding the pegs flush on the back side.
The second way is to cut your blanks to shape, drum sand them smooth, resaw them to thickness, then drill the peg holes in the business end of the forks to a depth of 1/4-inch so your dowels aren’t visible on the back side.
Once you’ve chosen your approach and have completed the drilling, cutting-to-shape, sanding and resawing steps, use your Shopsmith Router Package with the 1/4-inch Router Chuck and a bearing pilot, 1/4” round-over Router Bit to round-over all edges.
For the pegs, we suggest 1-1/2-inch long pieces, cut from a 1/4-inch dowel rod on the first (through) version — or 1-1/4-inch long pieces for the second version where the pegs don’t go all the way through. In both cases, be sure to use a waterproof glue.
Finishing: We recommend that you use a non-toxic Salad Bowl Finish or other non-toxic finish of your choice for this project.
Pricing: When made out of domestic hardwoods such as cherry, oak or maple, the measure and fork should bring between $15 and $20 as a pair and the cooling rack $15 to $20 by itself! Make them out of more exotic woods and they’ll bring even more. In fact, why not offer a variety?
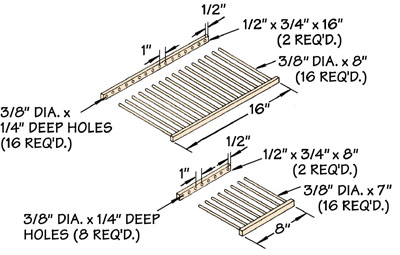
Cooling Racks
Few projects are easier to make than these Cooling/Drying Racks. Just two strips of wood, joined together by a series of dowels. Start with pieces of 3/4-inch thick stock, 8-inches or 16-inches long and ripped to 2-3/8-inches wide (this will make four 1/2-inch thick sides).
Set up your drill press with a 3/8-inch brad point bit. Lay a 2-inch to 3-inch wide piece of scrap stock on your drill press table surface, up against your rip fence. Attach a piece of masking tape to the face of your rip fence where it meets your scrap stock. Using a pencil, draw index marks on the tape that you’ll use to position your stock for making each of the 16 (or 8) dowel holes.
Be sure your table and drill bit are perpendicular. Set your workpiece on edge and adjust your quill stop so it drills all the way through the 2-3/8-inch width of the stock and barely into your scrap stock. Drill all the holes as shown by the Assembly Drawing.
Once you’ve drilled all your holes, use your table saw (with appropriate push sticks, etc.) to slice off the 1/2-inch thick sides you’ll be needing. Then, run them over the jointer to smooth the faces and sand all the edges smooth before gluing the dowels into position with a waterproof glue. Once the glue has dried, sand the dowels off flush. Few projects are easier to make than these Cooling/Drying Racks. Just two strips of wood, joined together by a series of dowels. Start with pieces of 3/4-inch thick stock, 8-inches or 16-inches long and ripped to 2-3/8-inches wide (this will make four 1/2-inch thick sides).
Set up your drill press with a 3/8-inch brad point bit. Lay a 2-inch to 3-inch wide piece of scrap stock on your drill press table surface, up against your rip fence. Attach a piece of masking tape to the face of your rip fence where it meets your scrap stock. Using a pencil, draw index marks on the tape that you’ll use to position your stock for making each of the 16 (or 8) dowel holes.
Be sure your table and drill bit are perpendicular. Set your workpiece on edge and adjust your quill stop so it drills all the way through the 2-3/8-inch width of the stock and barely into your scrap stock. Drill all the holes as shown by the Assembly Drawing.
Once you’ve drilled all your holes, use your table saw (with appropriate push sticks, etc.) to slice off the 1/2-inch thick sides you’ll be needing. Then, run them over the jointer to smooth the faces and sand all the edges smooth before gluing the dowels into position with a waterproof glue. Once the glue has dried, sand the dowels off flush.
Finishing: We recommend that you use a non-toxic Salad Bowl Finish or other non-toxic finish of your choice for this project.

