Time-honored toy has been
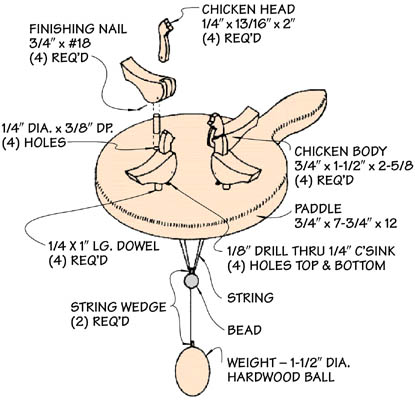
fascinating children for over 100 years!
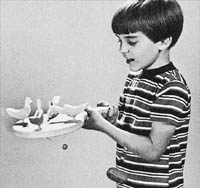
Old-fashioned toys — particularly animated ones — have been delighting children of all ages for generations . . . and these Pecking Chickens are certainly no exception! Just swing the toy in a horizontal, rotary motion and watch in amazement as each of the four chickens pecks, in order, at the seeds in the center of the paddle. This animated action, coupled with the pecking sound it makes during play, makes this toy an easy sale at craft fairs, flea markets and art shows.
If you’re making a quantity of these toys to sell (and you own a bandsaw), we recommend that you use a pad sawing technique, where you temporarily affix a stack of workpiece blanks together . . . saw out several parts at the same time . . . then separate them. Double-stick tape is the best choice for holding everything together nicely during cutting, then separating easily when you’re finished.
Step 1: Start by cutting out the paddle(s) with your bandsaw, scroll saw, sabre saw or coping saw.
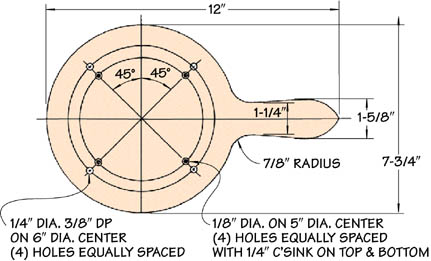
Step 2: If you’re using a pad sawing technique, leave the pieces attached together while you use your drill press to bore
the (8) holes in the paddle(s) according to the Paddle Layout.
Step 3: Next, separate the paddles (if you’re pad sawing more than one at a time) and use a countersink to bevel both the tops and bottoms of the 1/8-inch holes (not the 1/4-inch holes) in the paddle(s). This is done so the strings won’t snag or wear thin from rubbing on the sharp hole edges.
Step 4: Round over the sharp edges of the paddle(s) lightly with sandpaper.
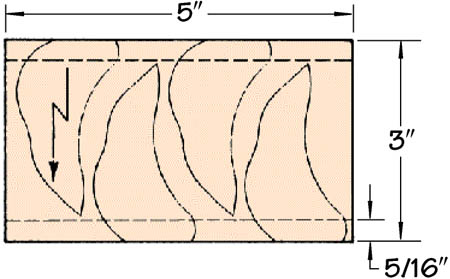
Step 5: In the end grain of some 3/4-inch thick chicken body stock, cut a 1/4-inch wide x 5/16-inch deep saw kerf with your dado
blade. This kerf will form the hinge in the body of the chickens that allows the head to pivot. Be sure to lay out the chicken bodies in a way that puts the kerfs at an angle, as shown in the Chicken Body Layout, so the chicken heads tilt forward slightly during play.
Step 6: If you’re pad sawing multiples at the same time, attach your blank workpieces together and cut out the chicken bodies. Once sawn, separate the bodies and drill your 1/4-inch dowel holes in the bottoms.
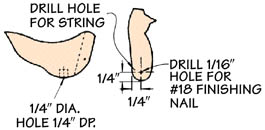
Step 7: Next, cut out the chicken heads from 1/4-inch thick stock. Separate the heads (if pad sawing multiples) and drill the
1/16-inch diameter holes for the #18 brad hinge and the string, as shown in the Chicken and Head Assembly. The brad pivot hole is drilled all the way through from side-to-side — while the string mounting hole is drilled only about 1/4-inch deep from back-to-front.
Step 8: Attach the strings to the heads by threading their ends into the head holes and gluing them in position with a
toothpick wedge (broken off flush) to hold them firmly. Hinge each head to a body with a #18 brad. Be sure to allow enough room for the string to slide. You may have to sand the sides of the heads slightly before assembly so they pivot freely in the body kerf.
Step 9:Mount the chicken bodies to the paddle with 1/4-inch dowels.
Step 10: Feed the strings through the countersunk holes in the paddle(s) and fasten them to a bead, as shown, using a small wedge to hold them tightly in position.
NOTE: Be sure all strings are the same length so they pull equally. Attach a weight (hardwood ball or lead fishing weight) to the bead.
Step 11: Glue the seeds in the center of the paddle, close enough for the chickens to peck at, but not actually hit.
Step 12: Paint or apply an oil finish, as you prefer.

