The Roll-Around Barbeque Cart

Have you ever noticed how outdoor cooking can often take a lot more effort and work than it really should? It seems that no matter how carefully you prepare for the job, you always have to run back into the house to get something you forgot or — to find a place where you’ll have enough room to cut up your meat or vegetables or otherwise prepare something that you’re planning to cook.
This easy-to-build Barbecue Cart will solve both of those problems for you. First, it comes complete with two spacious drawers, a condiment organizer, a utensil holder, a slide-out cutting board/shelf and plenty of space for all the cooking “stuff” you’ll be needing. The laminate-covered top offers plenty of space for food preparation and “staging” . . . it’s conveniently portable . . . plus . . . it’s attractive enough to fit in, no matter where you may choose to store it between cook-outs.
We made our example from red oak with a white laminate-covered top and lower shelf. If you’re planning to leave the table outside, be sure to choose a weatherproof wood like red cedar , redwood or cypress for the basic construction and use waterproof glue and brass screws to put everything together.
Step 1: First, cut all workpieces to size, following the dimensions outlined in the List of Materials.
NOTE: Be sure to allow all glued-up sub-assemblies to dry completely for 24 hours before putting them together with other sub-assemblies

Step 2: Using your drill press, drill (16) 3/8-inch diameter by 9/16-inch deep dowel holes in pieces B, C and D, and glue the facing assembly together, using 3/8-inch diameter by 1-inch long dowel pins as shown in Figure 1.
Step 3: Use your dado set-up or bandsaw to cut a 10-7/16-inch wide by 1-9/16-inch deep notch in the left side of the base assembly (F) to accommodate the pull-out shelf/cutting board, which will be installed later. See Figure 2.

Step 4: Drill (50) 3/8-inch diameter by 9/16-inch deep dowel holes in pieces A, E, F and G as shown in Figure 2. Assemble all pieces together (including the facing sub-assembly you made in step #2, above) using 3/8-inch diameter by 1-inch long dowel pins.
Step 5: Mount cleats (L) to the insides of the four legs (G) as shown in Figure 4, using 3/8-inch diameter x 1-inch long dowel pins. Position them 7-1/4inches down from the tops of the legs (G) or sides (F).

Step 6: Cut 1/4-inch by 3/8-inch deep tongue & groove joints in the web frame stiles and rails (pieces H, I and J), as shown in
Figure 3.
Step 7: Glue-up the web frame assembly as shown in Figure 3
Step 8: Mount the web frame assembly to the top surfaces of the cleats you glued into position in step #5, above, using four 1-1/4-inch x #8 wood screws. See Figures 3 & 4
Step 9: Cut the dado and rabbet joints in the drawer fronts and backs (parts W) and the drawer sides (parts V), as shown in Figure 5.

Step 10: Cut the 1-inch wide by 1/4-inch deep notches in the drawer fronts/backs (parts W) (see Figure 5). These notches will slide on the drawer runners (parts K, Figure 3) when assembled.
Step 11: Using glue, assemble the drawer sides (V) front/back (W) and bottom (X), as shown in Figure 5.
Step 12: Using the drawer assemblies you made in step 11, above as guides, glue the drawer runners (K) to the web frame assembly as shown in Figure 3. Be sure the drawers slide smoothly in and out before leaving the runners to dry.
Step 13: Using a router or belt sander, round-over the edges of the false drawer fronts (Y).
Step 14: Glue the false drawer fronts (Y) to the fronts of the drawer assemblies (See Figure 5).

Step 15: Construct the shelf support assembly (M, N, O, P, R in Figure 6) using 1-1/4″ x #6 wood screws.
TIP: Drill pilot holes for screws first to ease the assembly process.
Step 16: Mount the completed shelf support assembly (Figure 6) to the base assembly (Figure 2), using 1-1/4-inch x #8 wood screws. See Figures 6 & 7.
Step 17: Drill a 1/4-inch diameter by 1/2-inch deep hole, in a centered position, approximately 1/2-inch in from the back edge of the slide-out cutting board/shelf (part Q). Be sure this hole is in the TOP surface of the board. This protruding dowel will serve as a stop to keep shelf from pulling out completely. We’ll glue this stop into position later.

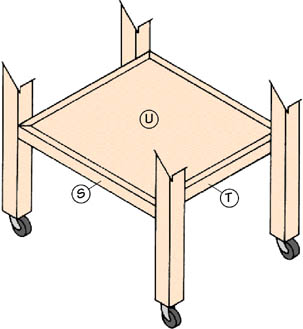
Step 18: Cut the miters for the bottom shelf front, back and side rails (parts S & T). See Figure 8.
Step 19: Assemble the bottom shelf with 3/8-inch diameter x 1-inch long dowel pins and glue. NOTE: Be sure to apply a liberal coat of glue around all edges of the top (U) to prevent any moisture or spills from seeping into the laminate substrate. If you’re planning to leave your Cart outdoors, use waterproof glue. See Figure 8.
Step 20: Attach the bottom shelf assembly you made in step 19 to the four legs (G) using 1-1/4-inch x #8 wood screws. We suggest that the shelf be positioned about 10-inch or so up from the bottoms of the legs. It’s your choice. See Figure 9.
Step 21: Cut the miters for the front, back and side rails (AA & BB) of the Cart to assembly (See Figure 10). Next, cut out the utensil holder (CC) and condiment holder (DD) pieces. See Figure 10.
Step 22: Using glue and 3/8-inch diameter x 1-inch dowels, put the top assembly together (Z, AA, BB). NOTE: Be sure to apply a liberal coat of glue around all edges of the top (Z) to prevent any moisture or spills from seeping into the laminate substrate. If you’re planning to leave your Cart outdoors, use waterproof glue. See Figure 10.
Step 23: Mount the top assembly to the base assembly, using 1-1/4-inch x #8 wood screws. See Figure 11.

Step 24: Mount the utensil holder (CC ) to the side of the top assembly using two 1-1/4-inch x #8 wood screws. See Figure 10.
Step 25: Round the edges of the condiment holder using a belt sander or router and mount it to the laminate top with four 1-1/4-inch x #6 wood screws. See Figure 10. If you prefer, counterbore the screw holes and fill them with wooden plugs.
Step 26: Finish sand the entire Cart. Be careful not to scuff your laminate surfaces in the process.

Step 27: Apply a stain, oil or other finish of your choice.
Step 28: Install the slide-out cutting board/shelf (Q) and glue the 1/4-inch dowel pin into position as a stop.
Step 29: Mount the pulls of your choice on the drawers and slide-out shelf.
Step 30: Mount the casters
Step 31: Enjoy !

