Work-Saving Production Note: Although we turned our examples using conventional Lathe Turning Chisels and workpiece mounting techniques, multiple copies of the Rolling Pin may be turned more quickly by using Shopsmith’s Lathe Duplicator.
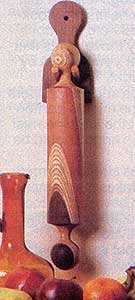
Here’s an attractive, contemporary style Rolling Pin & Holder that’s sure to be a real conversation-starter in anyone’s kitchen. For our example, Rude used purpleheart, 11-ply Baltic Birch plywood (imported from Scandinavia & free of all voids), walnut and maple…but you can use virtually any wood species you desire. In fact, the more different woods you use, the better your chances of having just the right Rolling Pin for every customer who walks your way!
Rude has turned many of these graceful Rolling Pins for an East-coast gourmet magazine that used to offer them to their readers for $35 each…way back in the late 70’s and early 80’s. In today’s market, they’re worth even more.

Start by gluing-up your stock to create a 2-1/2″ x 2-1/2″ x 18-1/2″ block. To achieve the slanted grain effect, glue up a black that’s at least 7″ to 8″ wide, then use your Bandsaw to slice the stock on an angle (See Fig. 1). Glue everything together using waterproof resorcinol or polyurethane glue so the Rolling Pin can be cleaned with soap and water after each use (that is, IF it’s used, since a lot of your buyers will surely use it merely for decoration).
Cut on a bevel, turning the stock will open up a lot of beautiful grain, but you’ll want to be careful that the exposed plies don’t catch your Lathe Chisel and tear themselves as you turn the Pin.
Mount your stock between centers. To prevent burning, use a Ball Bearing Tailstock Live Center. Start by using your >Gouge to rough your blank down to a smooth cylinder. Always hold your Chisel lightly to prevent jerky movements and keep from wearing yourself out from holding the Chisel too tightly.
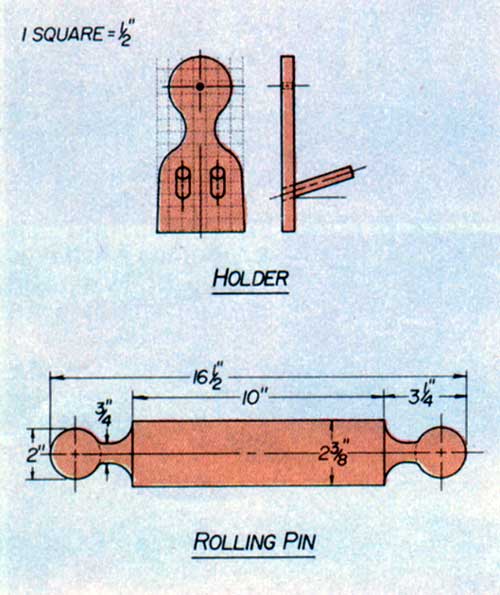
First, use a pencil to mark the handle locations, then use an Outside Caliper and your Parting Tool to establish the diameters of the middle portion of the Pin and the Handle Knobs. Then, return to your Gouge and cut the Knob nearest the Tailstock first – making each Knob as wide as it is thick.
Switch to a Roundnose Chisel to create the sweeping transition areas from the Knobs to the Pin Body.
Once the basic shape has been turned…and while it’s still mounted on the Lathe…sand the Pin with 80-grit, followed by 100-grit, then 180-grit sandpaper to achieve a super-smooth surface. Finish with Salad Bowl Finish or non-toxic Preserve Oil Finish.
The Holder is made from a piece of scrap wood that’s 1/2″ thick x 3-1/2″ wide, with 3/8″ dowels and a 1/4″ diameter hole at the top for hanging it on the wall. It’s just that simple.

