Here’s a super project that’s quick to cut out and even quicker to assemble

We know….today, everybody has a cell phone attached to their belt, the side of their purse and even the dashboard of the car. After all, this IS the “mobile society”, isn’t it? Well….yes….but there are always those “hold-outs” who prefer to have a number of hard-wired phones distributed conveniently around the house.
Question is….where do you put them? Not every room has a convenient place for a phone…and even fewer yet have room to keep a phone book and notepad in close proximity. Enter this dandy little stand from the ’80’s. Even if you decide not to try and market these stands for use with the telephone, they’ll also make great Side Tables for a small lamp and some reading materials.
So….before we get started, let’s talk briefly about three things:
DESIGN
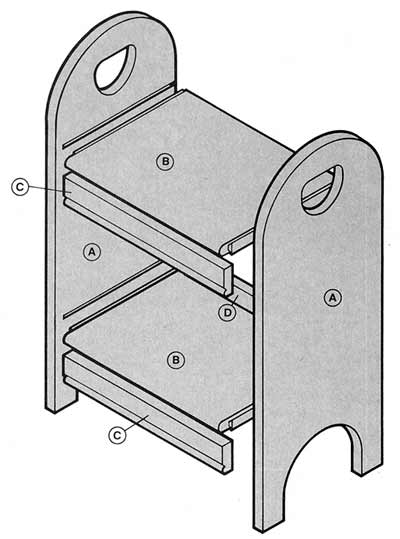
As you can see, our stand is really quite simple…almost “Shaker-Like” in its design. However, with just a few simple changes, its appearance can be altered completely. Change the handle cut-outs to a heart shape for a “Country” look…or even use a more elaborate fretwork design of your own. Create a “Mission” look with tapered Sides and re-designed “legs”. Cut the Sides off flush with the Top Shelf for a more contemporary look. Change the appearance of the Shelf Facings. Add a shelf for more utility. The options are endless.
JOINERY
The second of these three points has to do with the way this project goes together with sliding dovetail joints. In our example, we used “stopped” dovetails that are only visible from one side of the project. However, these could just as easily be full “through” dovetails where the joinery shows prominently from both sides. You might even consider making the Sides of maple and the Shelves of walnut to give your dovetail joinery a contrasting look. Another (much simpler) option would be to use straight dado joints instead of dovetails.
MULTIPLICITY
The final point has to do with the fact that each Stand/Table is quite simply comprised of only seven separate pieces of wood, cut into just four sizes. That’s it. And that means you can build a bunch of these tables in almost the same amount of time that it would take you to make just a couple. The secret lies in the efficiency of your machine set-ups. With our example, you’ll have just four ripping set-ups (12″, 11-5/8″, 2-1/2″ and 1-1/2″)…and four crosscut set-ups (31″, 16-1/2″ and 16″).
For added efficiency, try “pad-sawing” the Side shape cut-outs and leg shapes in pairs if you’re using your Scroll Saw or in stacks of up to six if you’ve designed them so you can use your Bandsaw without having to make a “piercing” cut. You can hold your multiples together temporarily during this process by using some high-strength Double-Stick Tape. So, let’s get started on building the design shown here.
1. Cut all stock to size, according to the Bill of Materials.
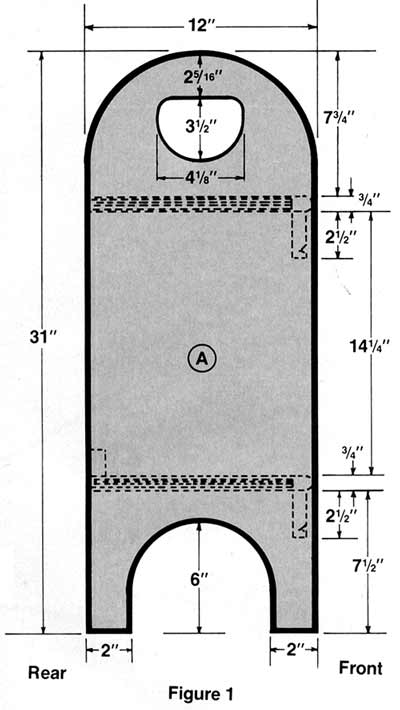
2. Use your MARK V Router Package or a Router Table with a 3/8″ Dovetail Bit to cut the four 3/8″ stopped dovetail grooves (11-3/8″ long) in Sides (A) as shown in Fig. 1. Be sure to start both dovetail grooves at the rear of the Sides (>A).
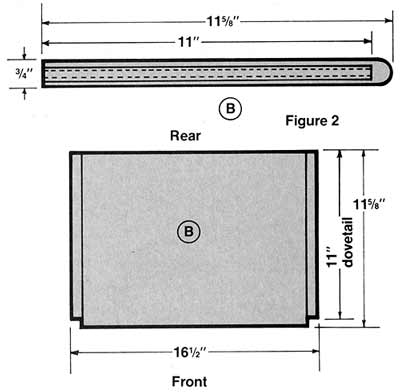
3. Cut the matching four dovetails on the ends of the Shelves (B) as shown in Fig. 2.
4. Using a Router set-up with a 3/8″ Round-Over Bit, round over the front edges of the Shelves (B).
5. Using your Bandsaw or Scroll Saw, round off the tops of the Sides (A) and cut out the openings at the bottoms (that form the legs). Use Your Drum Sander to smooth the inside edges.
6. Drill starter holes in Sides (A) at their tops where the decorative areas are to be cut out (See Fig. 1). Use your Scroll saw to cut out the openings.

7. Cut the decorative edge on the fronts of the Shelf Facings (C). We used a Shaper Set-up with a Bead & Bevel Cutter (See Fig. 3).
8. Assemble the Shelves (B) to the Sides (A) using the dovetails, glue and some clamps. Wipe away any excess glue immediately with a damp cloth.
9. Install the Shelf Facings (C) and the Bottom Shelf Back (D) with glue and clamps. NOTE: The two Shelf Facings (C) should be attached flush with the fronts of the Shelves (B).
10. Finish with a stain of your choice.

