A popular project that’s easy to make — and even easier to sell

Here’s a simple project, featuring quick and easy butt, rabbet and dado joints that let you cut out the various components and put them together in a flash. We made ours from knotty pine, but it would look – and sell – even better (and for more money) if it was made from cherry or oak.
LIST OF MATERIALS
(finished dimensions in inches)
| A | Sides (2) | 1/2 x 4 x 20 |
| B | Back | 1/2 x 8-1/2 x 24-3/4 |
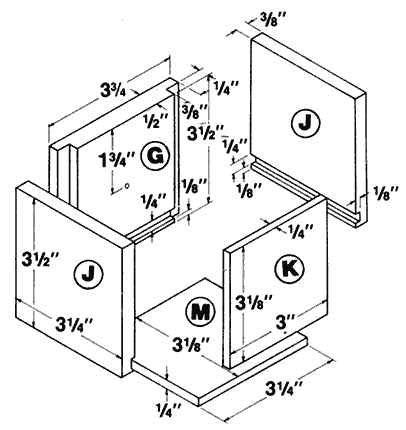
| C | Horizontal Partitions (2) | 1/2 x 3-1/2 x 8-1/4 |
| D | Bottom | 1/2 x 3-1/2 x 8-1/4 |
| E | Center Drawer Partitions (4) | 1/2 x 3-1/2 x 4 |
| F | Vertical Partition | 1/2 x 3-1/2 x 11-3/4 |
| G | Small Drawer Fonts (6) | 1/2 x 3-1/2 x 3-3/4 |

A COUPLE OF VALUABLE TIPS:
TIP #1: These Cabinets could easily be made in different styles by merely altering the shape of the Back (B) and the Sides (A). For example, a straight top and bottom on the Back with straight Sides (instead of curves at the top and bottom) will produce a more contemporary style.
Changing the Knobs from porcelain to a more contemporary style is yet another way to easily produce another variable on this Cabinet.
TIP #2: Considerable time can be saved by Stack or Pad-Cutting the profiles at the top and bottom of the Backs (B) and Sides (A). Once you’ve thicknessed these pieces and cut them to the proper size on your Table Saw, merely attach a stack of up to four of them together with our High-Adhesion, Double-Stick Tape then cut out the profiles on all four at once, using your Scroll Saw or Bandsaw.
This same procedure could be used for drilling the Mounting Holes in the Backs and the Knob Mounting Holes in the Drawer Fronts.
Resaw a 5-foot piece of 1″ x 4″ stock, using your bandsaw for the 1/4″ and 3/8″ thick pieces (J, K, L, M & N). Set up your cuts so you end up with 9/32″ and 13/32″ stock that you’ll then run through your planer to arrive at the 1/4″ and 3/8″ thicknesses.
Plane a 4-foot length of 1″ x 10″ – and a 7-foot length of 1″ x 4″ to a thickness of 1/2″.
Cut the Back (B) from the 1″ x 10″ stock. Then rip the prepared 1/4″ stock to 3-1/8″ for the Drawer Backs (K & L) and Drawer Bottoms (M & N). Next, rip the Sides (A) to 4″. Do not rip the Back (B) to finished width, yet.
Cut all parts to length, according to the Bill of Materials. Shopsmith’s 24″ Miter Gauge Extension Face offers an adjustable stop that you can set to cut multiple pieces to the exact same length with ensured repeatability and precision.
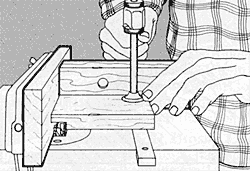
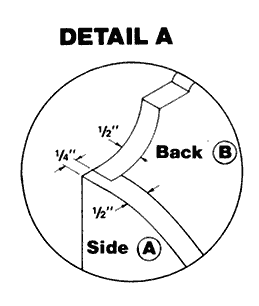
Rip the 1/2″ wide x 1/4″ deep rabbets in the backs of the sides (A) using your Dado set-up and a wooden, shop-made auxiliary fence to keep from cutting into the face of your Rip Fence (See Detail A). Use a Feather Board and a Push Block to keep your hands out of harm’s way when making these cuts.
Next, re-adjust your Rip Fence and your Blade’s depth-of-cut to form the 3/8″ wide x 1/4″ deep rabbets in the Drawer Fronts (G & H) using the same Fence attachment and a shop-made wooden Miter Gauge face for support (See Fig. 1). Be sure to make these cuts slowly to prevent chip-out on the exit side of your cuts.
Adjust your Dado Blade to 1/4″ and use your Rip Fence to guide your stock as you cut the 1/8″ deep grooves in the Drawer Sides (J) and Fronts (G & H) to accept the Drawer Bottoms. Again, use a Push Block for safety.
Remove your Rip Fence and cut the dadoes in the sides (A) and partitions (C & F).
NOTE: As an option, you could also use the Shopsmith Router Table Kit with a Straight Router Bit of the appropriate width to perform this or any of the previous rabbeting, dadoing or grooving operations.
Cut out the Side (A) contours using your Bandsaw or Scroll Saw . Then, use a small Drum Sander to smooth the curved areas.
Dry assemble the Sides (A) and parts (C, D, E & F) with clamps and check for fit. Disassemble and then use glue and small brads on the outside joints…and glue only on the interior joints.
NOTE: Be sure to check all joints for squareness before leaving the glued Cabinets to set-up thoroughly.
Rip the Back (B) to width, then cut and sand the top and bottom contours. Drill the 1/4″ mounting hole and attach the Back to the Sides (A) with 3/4″ brads.
Drill the Knob mounting holes in the Drawer Fronts (G & H).
Assemble the Drawers with glue and 3/4″ brads. Once the glue has dried completely, use your Belt Sander to sand each Drawer to fit perfectly in its “cubbyhole”. Be sure to number each Drawer on the back or bottom to indicate which Drawer fits in which location.
Finish sand the entire Cabinet and round all the edges slightly to achieve a well-worn, Colonial effect. Apply stain if desired, followed by a finish coat of satin polyurethane or similar material. Install the Drawer Knobs.

