Here’s a tall, floor-to-ceiling bookcase with the versatility to serve a variety of purposes

Here’s a relatively simple-to-build bookcase that’s sure to make an attractive addition to any room in your home. Designed to fill the space from floor-to-ceiling, it offers ten shelves and cubbyholes for books, decorator accents and audio/visual components, as you prefer. Our example features a swiveling, slide-out shelf for a compact TV set plus three adjustable shelves and an enclosed cabinet for storing audio/videotapes, compact discs or other items.
A FLEXIBLE DESIGN
The nice thing about this simple design is the fact that it can easily be modified to suit your specific needs. For example, if your room ceiling is lower than 8-feet, make the bookcase shorter. If you need more shelves for audio/visual components, simply add them. If you need a larger space for your television, just eliminate some of the bookshelves, make the cabinet deeper or adjust it accordingly. A few simple adjustments are all that’s required to make this attractive bookcase just what you need.
Our example has been constructed in five separate units….the carcase or outer frame which is all A/A (“A” grade on both sides), 3/4″ red oak veneer plywood; the face frame which is solid 3/4″ red oak; the moldings; the cabinet door; and the TV shelf with hardware.
SAFETY NOTE: If you’re using a Shopsmith MARK V to build this project, a helper will be handy (and much safer) for cutting the large plywood pieces. If a helper isn’t available for one reason or another, we recommend that you consider adding a Shopsmith Support Table and a Roller Stand or two to help you more safely control the large, cumbersome pieces.
LIST OF MATERIALS
(finished dimensions in inches)
HARDWARE
Quantity Description
8 3/8″ dowels
4 dozen 2″ finishing nails (6-penny)
1 dozen #8 x 1-1/4″ wood screws
2 dozen #8 x 3/4″ wood screws
1 dozen Plastic shelf pin/brackets
2 Cabinet door hinges with screws (optional)
1 TV extension slide (optional)
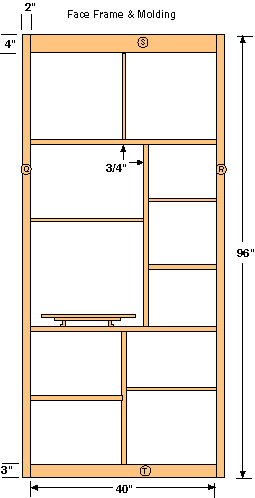
A Left Side 95-5/8 x 16
B Top 44 x 16
C Fixed Shelf 23-1/2 x 16
D Fixed Shelf 19-3/4 x 16
E Fixed Shelf 19-3/4 x 16
F Adjustable shelf 22-3/4 x 16
G Fixed Shelf 43-1/4 x 16
H Adjustable Shelf 15-3/4 x 16
I Fixed Shelf
26-3/4 x 16
J Shelf Divider 32-1/8 x 16
K Shelf Divider 40-1/2 x 16
L Shelf Divider 23 x 16
M Shelf Divider 15-3/4 x 16
N Shelf Divider 43-1/4 x 16
O Shelf Divider 95-5/8 x 16
P Shelf Divider 21-1/2 x 15
FACE FRAME – 96″ x 12″ x 3/4″ red oak
Q Left Side 96 x 2
R Right Side 96 x 2
S Top 40 x 4
T Bottom 40 x 3
CROWN MOLDING – 48″ x 10″ x 3/4″ red oak
SHELF MOLDING – 48″ x 10″ x 3/4″ red oak
DOOR FRAME – (optional) – 48″ x 6″ x 3/4″ red oak
DOOR PANEL – (optional) – 26″ x 15″ x 1/4″ red oak veneer plywood
So, let’s get started.
1. Cut the plywood to size. Begin by ripping the plywood lengthwise into 16″ wide (or your preferred width) strips. Once the pieces are ripped, crosscut them to length as shown in the List of Materials (or to the lengths you prefer, in the case of a modified plan).

2. Cut the dadoes. Mark the positions of all dadoes on the insides of your two outside vertical panels (A & O). Follow the positions shown in the drawing or modify them as you see fit. Remember that (almost) all dadoes will be 3/4″ wide and cut to a depth equal one-half the thickness of your plywood (or 3/8″).
NOTE: The dadoes on the tops of the two sides (A & O) will form 3/8″ x 3/8″ rabbets – and the bottom dadoes on both sides of the vertical shelf divider (J) will only be 1/4″ deep.
Unplug your MARK V and install your Stack Dado Set or Wobble Dado Blade according to the instructions.
Carefully line-up the marks you made on the edges of your plywood with your Dado Blade. Start by crosscutting your dadoes with one edge flat against your Miter Gauge. A Miter Gauge Extension Face or Cross-Cut Sliding Table and Auxiliary Table will provide additional workpiece support and precision when making these cuts.
This process can be a bit tricky since furniture grade oak plywood has a thin veneer on each outside surface that is highly susceptible to splintering if it’s not cut properly. There are two ways to avoid this. One way is to make your dado cuts in two passes….the first just a little over 1/32″ deep to “score” the veneered surface before cutting your dado to its final depth. The second way is to cover the entire length of your dado cut with a piece of masking tape before making your cut (be sure to set your blade cut depth just a “shade” deeper to compensate for the thickness of the tape). If you’re using this second procedure, once your cut’s been made, slowly and carefully remove the tape.
Set your MARK V’s Speed Dial to “R” and make your cuts, pushing your workpieces slowly over the dado blade, almost at a snail’s pace, giving the blade ample time to make the cuts.
Once you’ve cut the dadoes on the sides (A & O), go ahead and cut the remaining dadoes on the shelf divider (K) and fixed shelves G & N). Next, mark the dadoes on the vertical shelf divider (J). NOTE: Since the bottom dadoes on this piece will be adjacent to each other, adjust your depth-of-cut to make them just 1/4″ deep. Mark and cut the single dado in the center of the top (B) but NOT the ones on the ends.
3. Cut the other dadoes and rabbets. Once you’ve cut all of the ¾” wide dadoes, re-set the width of your dado cut to 3/8″. As you can see from the illustration of the top corner dado-rabbet joint, the dadoes on the ends of the top (B) are just 3/8″ wide by 3/8″ deep and 3/8″ in from the ends of the top. They are designed to accept the 3/8″ by 3/8″ rabbets formed on the top ends of the sides (A & O). Mark and cut these dadoes. Next, make the L-shaped rabbet cuts on the tops of the sides (A & O), as shown in the Drawing. Use the same 3/8″ wide adjustment on your dado blade to cut them to a depth of 3/8″, forming the rabbets. NOTE: Notice that these cuts are on the opposite sides of the side pieces (A & O), from the dadoes you cut previously.
4. Finishing. We recommend that you finish all plywood boards at this time so you can work with them while they lie flat to avoid runs. Here’s another tip: Put masking tape on all board ends and on the bottoms of all dadoes where the joints come together. This will give all your glue joints a better bond.
5. Drill shelf bracket holes. We used brown, plastic shelf brackets to support our adjustable shelves. They’re readily available at your local hardware stores or home centers like Lowe’s. Choose the ones made to fit into 1/4″ holes. Mark and drill 1/4″ holes, set 2″ in from the fronts and backs of the right side (O) and vertical shelf dividers (J & K). Space them at 2″ vertical intervals.
6. Glue up the carcase.
For this, you’ll definitely need the help of an assistant to provide an extra pair of hands while you glue-up all the awkward carcase pieces with yellow woodworker’s glue. Before you get started, dry assemble all of the pieces to be certain everything fits together properly. If not, make any necessary adjustments before applying glue to any components. Get all the clamps you’ll be needing for the job and go to work. Leave out the adjustable shelves (F, H, M) and the TV shelf (P) during the glue-up. Don’t glue on the top (B), yet. Just set it into position on top without any glue for now.
7. Cut the pieces for the face frame.
Start by cutting the left side (Q), right side (R), top (S) and bottom (T). Do not cut the narrower, 3/4″ molding strips at this time. If possible, use a helper or roller support stand to support the long, 96″ pieces as you cut them.
8. Joint the edges. Run the edges of your face frame pieces over the jointer to square them up and smooth them out. This gives a much smoother edge than you can achieve with a table saw alone.
9. Drill the dowel holes.
Set up your MARK V for the horizontal boring mode. Drill 3/8″ holes in the top and bottom edges of the long, 96″ side pieces (Q & R). Each joint will have two dowels. Measure the spacing of these holes carefully so they will fit into the ends of the 3″ wide bottom piece (T) and the 4″ wide top piece (S). Make your holes slightly deeper than one-half the length of your 3/8″ dowels to allow for glue escapement.
10. Match the dowel positions. Place two 3/8″ dowel centers into the holes at the bottom edge of the left side piece (Q). Use a try square or combination square to line up the bottom piece (T) with the left side piece, then push the bottom piece (T) against the side piece (Q) and tap with a mallet to transfer the hole locations to the bottom piece (T). Repeat this process for the right side piece (R). Follow the same procedure for the top piece (S).
11. Glue up the outer frame. Glue the 3/8″ dowels and edges of the outer frame pieces where they will join. Clamp them together and allow the glue to dry.
12. Finish the frame. Follow the same procedures you followed earlier. Finish all additional pieces similarly, just prior to assembling them.
13. Attach the face frame. Use small finishing nails (two inches long – 6 penny) to attach the outer face frame to the carcase. To avoid splitting the oak, it’s a good idea to drill small pilot holes into the frame first.
14. Cut the shelf and divider edge moldings. Working with one of your 48″ x 10″ x 3/4″ pieces of red oak, rip a sufficient quantity of 3/4″ wide strips (off the full 48″ length of your oak) to create solid wood edge moldings for the fronts of all shelves and vertical dividers, as well as the front and sides of the TV shelf.
15. Crosscut the edging to their appropriate lengths. Measure the lengths of these moldings after the outer frame has been attached to the carcase. Begin with the two full-width horizontal shelves (G & N). Next, cut the moldings for the vertical dividers (L,K & J) to fit between these shelves. Finally, cut the edge molding on the remaining shelves (C,D,E,F,H,I & M), keeping in mind that they will be attached using common butt joints as shown in the “Face Frame & Molding” illustration.
16. Attach the edge moldings. After finishing the moldings (except for their back or glued edges), attach them to all edges using glue and 2″ finishing nails. NOTE: Don’t forget to pre-drill nail pilot holes in your oak strips to prevent splitting. Use a nail set to recess the heads of all nails, then cover the holes with wood patch that’s been mixed with matching stain.
17. TV shelf hardware. A combination shelf slide and lazy susan commonly referred to as a “TV Extension Slide” will be used to hold your TV shelf (P) and eventually your TV set. Attach the slide to the TV shelf (P) and fixed shelf (N) with #8 x 3/4″ wood screws.
18. Make the top crown moldings. Use your Shopsmith Shaping Package with a Bead & Cove Cutter to create the crown molding for the top of the bookcase. Start by shaping one edge of a wide piece of your oak…then flipping your piece over and shaping the opposite edge. Once both edges are shaped, rip one side down to 3″ wide, and the opposite side down to 1″ wide. Repeat this process so you’ll have two 3″ wide and two 1″ wide molding strips that are 48″ long, each with one bead & cove edge.
All of the molding pieces must be measured precisely and cut with 45-degree bevels on the front corners, where they meet the mating moldings on each side. To avoid mistakes, we suggest clamping each 3″ piece in place at the top of your bookcase and checking precisely where the bevel cuts should go. A Shopsmith Miter-Pro , used with your MARK V Miter Gauge will help ensure the accuracy of these 45-degree cuts.
Once you’ve cut the 3″ wide pieces, lay your 1″ wide pieces on top of the 3″ pieces and mark them so they will continue your 45-degree angles. Note that the 1″ pieces must eventually be longer than the 3″ pieces for the corners to meet properly when the moldings are assembled to the bookcase carcase.
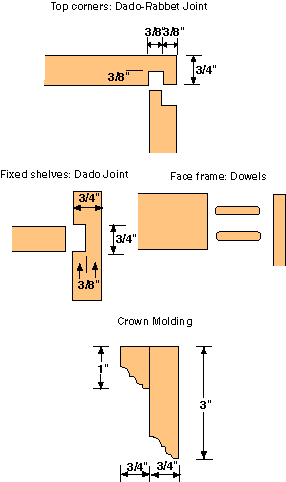
After cutting the bevels, glue-up the 3″ and 1″ moldings together as shown in the “Crown Molding” illustration. Line up the beveled edges and clamp them together while the glue dries.
Finally, clamp each of the three pieces of assembled crown molding into position on the top of your bookcase. Line up the two front corners carefully and clamp them into position while you drill pilot holes from the inside of the bookcase – through the top face frame (S) and sides (A & O) and into the back sides of the moldings. NOTE: When assembled, the molding should protrude 3/8″ above the top surface of the cabinet top (B), making an overall bookcase height of 96″. Assemble the moldings to the bookcase using glue and #8 x 1-1/4″ wood screws. Once the moldings are assembled to the carcase, glue the top (B) into place.
19. Make the door. This door is optional and hides the audio/video tape and compact disc storage shelves. The vertical door stiles and horizontal rails can be made on the shaper using the Complete Cabinet Set cutters. Or, if you prefer, you could use the Shopsmith Router Package , Routing Table Kit or Pro Fence System Router Table with the Reversible Stile & Rail Router Bit Set.

It’s important to note that using these cutters properly requires some practice and, depending on whether you use the shaper cutter set or router bit set, the overall profiles they produce may be somewhat different than the photo shown immediately below. Therefore, it’s recommended that you practice making these cuts on some scrap wood (of the exact same thickness) prior to cutting the profiles in your oak pieces. It may be a challenge for you to achieve a perfect fit, but the finished appearance of your door will make all the effort worthwhile.
Once your rails and stiles have been cut and their edges created, slide a piece of 1/4″ thick oak veneered plywood into the groove on the inside edges of your door frame pieces before gluing the stiles and rails together. Do not glue the plywood panel to the rails & stiles. No dowels will be necessary for assembly, since the cutters you use will create the proper corner joints for you.
Apply the appropriate finish to your assembled doors, add hinges and attach the doors to your bookcase.

