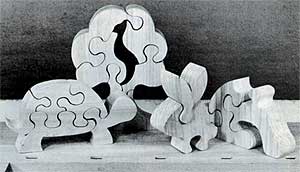
Through the generations, puzzles have always been popular with children, being one of the few toys the kids can take apart without fear of breaking them (not that most kids are concerned about breakage, even though us parents certainly are). The three puzzles presented here, have two added attractions: First, they’re easy to build and second, they’re thick enough to stand up on their own once your child has pieced them together.
1. Glue up the pieces of stock you’ll need from 1-1/2″ or thicker lumber:
- Tortoise: 11-1/2″ x 6″
- Hare: 10″ x 11-1/4″
- Partridge in a Pear Tree: 8-3/4″ x 11-1/2″
NOTE: When making the partridge, consider using wood of a color that contrasts with the remainder of the tree. For example, a walnut partridge in a poplar tree – A poplar partridge in a cherry tree, etc.
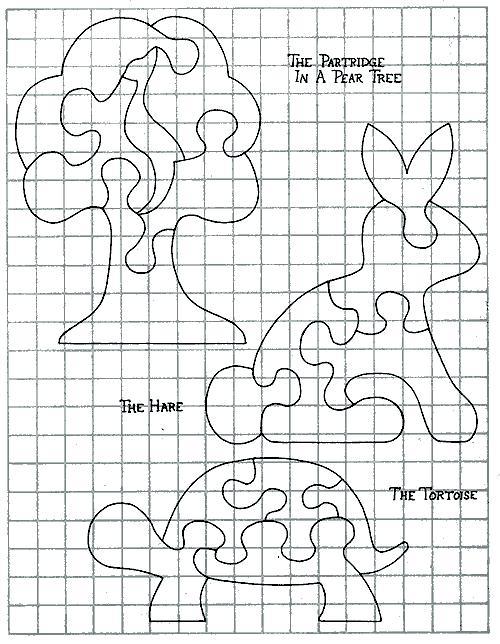
2. Duplicate the patterns shown here by enlarging them on a photocopy machine or by using the gridded paper method. Each square in the drawings shown here are 1″.
3. Affix the drawings to your workpieces. Artist’s rubber cement works best for this. “Butter” the back side of your drawing and the top side of your wood with rubber cement and allow it to dry for about 5 minutes before attaching the drawing to the stock.
4. Using your Bandsaw or Scroll Saw, cut the outer profiles of the puzzles first.
5. Next, use a thin Bandsaw or Scroll Saw Blade to cut out the separate puzzle pieces.
6. Peel off the paper patterns and use your Abrasive Cleaning Stick to remove any rubber cement residue from your wooden pieces.
Some puzzle-making tips:
- Use the thinnest blade possible when cutting out the interlocking piece shapes to ensure a tight fit.
- Since you’ll be working with thick woods, feed the wood slowly through the cuts to avoid burning. However, remember that feeding too slowly could widen your kerfs and cause a sloppy fit of the pieces. Make some test cuts on thick wood to get “the feel” of everything before cutting out your actual, pieces.
- Use fine grit papers and sand everything just enough (by hand) to remove splinters and slight imperfections. Excessive sanding will spoil the fit of interlocking pieces.
- Designing your own puzzles is simple. Just make the exterior shapes match your child’s favorite animals or objects, but be sure to use enough reverse curves or “heads-and-necks” to be sure your pieces interlock properly without pulling apart.
- When finishing children’s puzzles, use a non-toxic finish such as Salad Bowl Finish or Preserve Oil Finish to protect your children from harm. NEVER use lead-based or toxic paints or finishes for toys or projects that come into contact with food products.

